# UMAP of cells in each cluster by sample
DimPlot(seurat_integrated,
label = TRUE,
split.by = "sample") + NoLegend()
split.by sample identity and colored by cluster identity.
This lesson guides participants through evaluating the quality of clustering in single‑cell RNA‑seq data. Participants learn to diagnose clustering artifacts, interpret PCA and UMAP visualizations and use known marker genes to hypothesize cell type identities. The lesson emphasizes an iterative approach to assessing cluster validity and determining when re‑clustering or additional quality control steps may be beneficial.
R, Seurat, Scanpy, Clustering, Quality control, Marker genes
Approximate time: 90 minutes
In this lesson, we will:
Now that we have performed the integration, we want to know the different cell types present within our population of cells. This process will require us to map our clusters to cell types based upon gene expression. Therefore, it is key that we assess the quality of our clusters and begin to characterize the gene expression of each one.
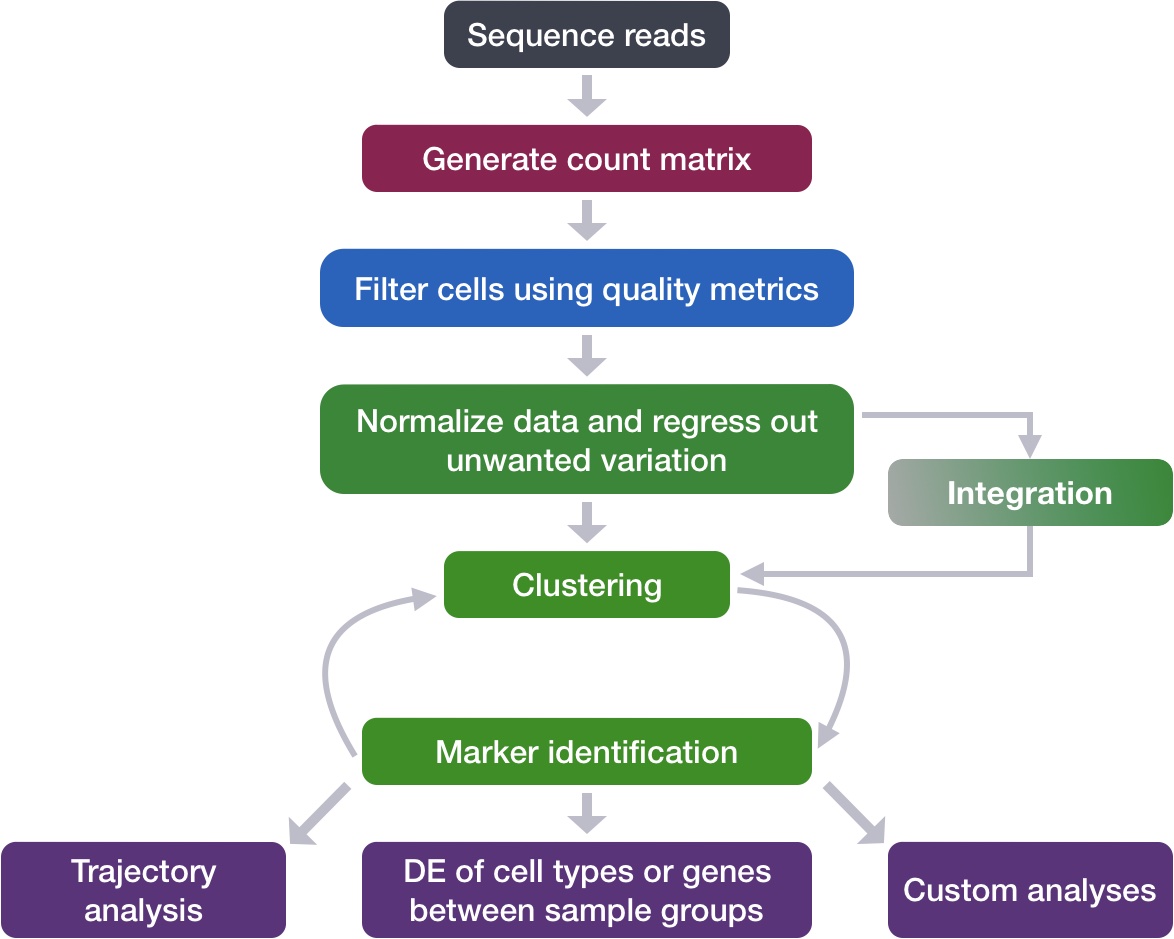
To determine whether our clusters might be due to artifacts such as cell cycle phase or mitochondrial expression, it can be useful to explore these metrics visually to see if any clusters exhibit enrichment or are different from the other clusters. However, if enrichment or differences are observed for particular clusters it may not be worrisome if it can be explained by the cell type.
We can start by exploring the distribution of cells per cluster in each sample. One way to do so is to visualize the cells per cluster for each sample using the UMAP:
# UMAP of cells in each cluster by sample
DimPlot(seurat_integrated,
label = TRUE,
split.by = "sample") + NoLegend()split.by sample identity and colored by cluster identity.
# Create plot with the correct dimensions
fig, axes = plt.subplots(1, 3, figsize = (15, 5))
# Plot UMAP
# All cells together
sc.pl.embedding(adata_integrated,
color = "leiden_0.8",
ax = axes[0],
show = False, basis = "umap_scvi",
legend_loc = "on data",
legend_fontsize = 14,
legend_fontoutline = 3)
# Control cells
sc.pl.embedding(adata_integrated, color = "sample",
groups = "ctrl", ax = axes[1],
show = False, title = "Ctrl",
basis = "umap_scvi")
# Stim cells
sc.pl.embedding(adata_integrated, color = "sample",
groups = "stim", ax = axes[2],
show = False, title = "Stim",
basis = "umap_scvi")
plt.show()
Looking at a UMAP is a great way to get a first pass look at your dataset, but we encourage you to visualize your data in multiple different ways. From the metadata, we can create custom visuals to evaluate our clusters. For example, looking at the number of cells from a sample in each cluster.
# Count the number of cells in each cluster and sample
n_cells <- seurat_integrated@meta.data %>%
count(sample, integrated_snn_res.0.8)
# Barplot of number of cells per cluster by sample
ggplot(n_cells,
aes(x = integrated_snn_res.0.8, y = n,
fill = sample)) +
geom_bar(position = position_dodge(),
stat = "identity") +
theme_classic() +
geom_text(aes(label = n), vjust = -.2,
position = position_dodge(1))
# Initialize figure
plt.figure(figsize = (12,4))
# Barplot of cells per cluster x sample
sns.countplot(data = adata_integrated.obs,
x = "leiden_0.8", hue = "sample")
plt.ylabel("Number of Cells")
plt.show()
Generally, we expect to see the majority of the cell type clusters to be present in all conditions; however, depending on the experiment we might expect to see some condition-specific cell types present. To assess how well the integration worked, we can once again plot the clusters, but this time show the proportions instead of counts.
# Barplot of proportion of cells in each cluster by sample
ggplot(seurat_integrated@meta.data) +
geom_bar(aes(x = integrated_snn_res.0.8, fill = sample),
position = position_fill()) +
theme_classic()
# Number of cells per cluster and sample
cell_counts = (
adata_integrated.obs
.groupby(["leiden_0.8", "sample"], observed = True)
.size()
.unstack(fill_value = 0)
)
# Number of cells per cluster (across all samples)
cells_per_cluster = (
adata_integrated.obs
.groupby("leiden_0.8", observed = True)
.size()
)
# Proportion of cells per cluster and sample
prop_df = cell_counts.div(cells_per_cluster, axis = 0)Let us take a look at what our new prop_df variable looks to ensure that we are computing proportions.
prop_df.head()prop_df which contains proportions of cells belonging to each sample and cluster.
| leiden_0.8 | ctrl | stim |
|---|---|---|
| 0 | 0.489786 | 0.510214 |
| 1 | 0.498378 | 0.501622 |
| 2 | 0.521866 | 0.478134 |
| 3 | 0.528868 | 0.471132 |
| 4 | 0.515046 | 0.484954 |
Now that we have confirmed that prop_df has our proportion scores we can plot the values as a barplot.
# Plot
prop_df.plot(kind = "bar",
stacked = True,
figsize = (10, 5))
plt.ylabel("Proportion")
plt.xlabel("Leiden 0.8")
# Move legend to the right
plt.legend(title = "Sample", bbox_to_anchor = (1.02, 1),
loc = "upper left", borderaxespad = 0)
plt.show()
These clusters look pretty similar between conditions, which is good since we expected similar cell types to be present in both control and stimulated conditions.
Next, we can explore whether the cells cluster by the different cell cycle phases.
We did not regress out variation due to cell cycle phase when we performed the SCTransform normalization and regression of uninteresting sources of variation. If our cell clusters showed large differences in cell cycle expression, this would be an indication we would want to re-run the SCTransform and add the S.Score and G2M.Score to our variables to regress, then re-run the rest of the steps.
# Explore whether clusters segregate by cell cycle phase
DimPlot(seurat_integrated,
label = TRUE,
split.by = "Phase") + NoLegend()
split.by cell cycle phase and colored by cluster identity.
# Create plot with the correct dimensions
fig, axes = plt.subplots(1, 3, figsize = (15, 5))
# Plot each phase
sc.pl.embedding(adata_integrated, color = ["phase"], groups = ["G1"], ax = axes[0],
show = False, title = "G1 Phase", basis = "umap_scvi")
sc.pl.embedding(adata_integrated, color = ["phase"], groups = ["G2M"], ax = axes[1],
show = False, title = "G2M Phase", basis = "umap_scvi")
sc.pl.embedding(adata_integrated, color = ["phase"], groups = ["S"], ax = axes[2],
show = False, title = "S Phase", basis = "umap_scvi")
plt.show()
We do not see much clustering by cell cycle score, so we can proceed with the QC.
Next we will explore additional metrics, such as the number of UMIs and genes per cell, S-phase and G2M-phase markers, and mitochondrial gene expression by UMAP. Looking at the individual S and G2M scores can give us additional information when checking the phase as we did previously.
# Determine metrics to plot present in the metadata
metrics <- c("nCount_RNA", "nFeature_RNA",
"S.Score", "G2M.Score", "mitoRatio")
FeaturePlot(seurat_integrated,
reduction = "umap",
features = metrics,
pt.size = 0.4,
order = TRUE,
min.cutoff = "q10",
label = TRUE)
FeaturePlot showing a variety of QC metrics with cluster annotated on top.
The min.cutoff argument will determine the threshold for shading. A min.cutoff of q10 translates to the 10% of cells with the lowest expression of the gene will not exhibit any purple shading (completely gray).
# Determine metrics to plot present in the metadata
metrics = ["total_counts", "n_genes", "S_score",
"G2M_score", "mito_ratio", "leiden_0.8"]
sc.pl.embedding(
adata_integrated,
color = metrics,
basis = "umap_scvi",
sort_order = True,
legend_loc = "on data",
size = 8,
ncols = 2)
order argument
The order argument will plot the smaller values underneath larger ones. Therefore, even if there is crowding due to having many cells, we would be able to easily see which cells have larger scores.
The metrics seem to be relatively even across the clusters, with the exception of nGene exhibiting slightly higher values in several closeby clusters. This can be more clearly seen when we look at the distribution as a boxplot.
When we looked at the UMAP, cluster 2, 4, 10, and 13 all appeared to have higher levels of n_genes.
# Boxplot of nGene per cluster
ggplot(seurat_integrated@meta.data) +
geom_boxplot(aes(x = integrated_snn_res.0.8, y = nFeature_RNA,
fill = integrated_snn_res.0.8)) +
theme_classic() +
NoLegend()
When we look at the boxplot representation, we can also see that cluster 16 also has higher than average n_genes. This is one of the benefits of using different visuals to understand your data.
# Boxplot of nGene per cluster
sns.boxplot(data = adata_integrated.obs,
x = "leiden_0.8", y = "n_genes",
hue = "leiden_0.8")
If we see differences corresponding to any of these metrics at this point in time, then we will often note them and then decide after identifying the cell type identities whether to take any further action.
We can also explore how well our clusters separate by the different PCs; we hope that the defined PCs separate the cell types well. To visualize this information, we need to extract the UMAP coordinate information for the cells along with their corresponding scores for each of the PCs to view by UMAP.
First, we identify the information we would like to extract from the Seurat object, then, we can use the FetchData() function to extract it.
FetchData() function
How did we know in the FetchData() function to include UMAP_1 to obtain the UMAP coordinates? The Seurat cheatsheet describes the function as being able to pull any data from the expression matrices, cell embeddings, or metadata.
For instance, if you explore the seurat_integrated@reductions list object, the first component is for PCA, and includes a slot for cell.embeddings. We can use the column names (PC_1, PC_2, PC_3, etc.) to pull out the coordinates or PC scores corresponding to each cell for each of the PCs.
We could do the same thing for UMAP:
# Extract the UMAP coordinates for the first 10 cells
seurat_integrated@reductions$umap@cell.embeddings[1:10, 1:2] umap_1 umap_2
ctrl_AAACATACAATGCC-1 7.180773 1.0550556
ctrl_AAACATACATTTCC-1 -8.677255 0.7604161
ctrl_AAACATACCAGAAA-1 -10.293033 4.0847508
ctrl_AAACATACCAGCTA-1 -8.619979 4.4538268
ctrl_AAACATACCATGCA-1 6.976209 -4.5865604
ctrl_AAACATACCTCGCT-1 -9.583503 1.6212997
ctrl_AAACATACCTGGTA-1 -8.749516 -5.8770076
ctrl_AAACATACGATGAA-1 5.919774 1.7553756
ctrl_AAACATACGCCAAT-1 -8.969940 2.4491638
ctrl_AAACATACGCTTCC-1 8.999050 4.1078180The FetchData() function just allows us to extract the data more easily.
# Fetch PC, cluster, and UMAP values
pc_data <- FetchData(seurat_integrated,
vars = c(paste0("PC_", 1:16),
"integrated_snn_res.0.8",
"umap_1", "umap_2"))
# Calculate average location of UMAP cluster (for labelling)
umap_label <- pc_data %>%
group_by(integrated_snn_res.0.8) %>%
summarise(x = mean(umap_1),
y = mean(umap_2),
.groups = "drop")Now that we have done all this data wrangling, let us take a look at the resultant dataframe that we will later plug into ggplot() for visualization.
# View PC scores for each cell
View(pc_data)| PC_1 | PC_2 | PC_3 | PC_4 | PC_5 | PC_6 | PC_7 | PC_8 | PC_9 | PC_10 | PC_11 | PC_12 | PC_13 | PC_14 | PC_15 | PC_16 | integrated_snn_res.0.8 | umap_1 | umap_2 | |
|---|---|---|---|---|---|---|---|---|---|---|---|---|---|---|---|---|---|---|---|
| ctrl_AAACATACAATGCC-1 | 15.6928762 | 2.656625 | 5.0046507 | 1.964188 | 0.8611552 | -1.511811 | 0.4718797 | 0.8202343 | -1.0971589 | 0.8929606 | 1.6464807 | -0.712333 | -0.4289154 | -0.0756493 | 1.1268523 | -0.6281146 | 3 | 7.180773 | 1.0550556 |
| ctrl_AAACATACATTTCC-1 | -23.2734858 | 6.131798 | -5.4222779 | -3.544927 | 0.2811355 | -8.518735 | 2.2149020 | 5.5775634 | 1.7169186 | 0.5331785 | -4.3733696 | 0.456551 | -2.0586971 | 0.0704529 | -4.0193159 | -4.9620301 | 2 | -8.677255 | 0.7604161 |
| ctrl_AAACATACCAGAAA-1 | -30.2753460 | -1.200586 | 6.6016491 | 1.124121 | -7.6994802 | 6.278448 | -10.5238135 | -18.8430602 | -0.0541862 | 2.7570347 | 8.2023694 | -4.105552 | 1.5749756 | -3.7233402 | 1.8533022 | 2.3827667 | 4 | -10.293033 | 4.0847508 |
| ctrl_AAACATACCAGCTA-1 | -20.9068963 | -2.957269 | 5.6598662 | 3.850735 | -11.5928272 | 2.492958 | -4.4468665 | 1.1672305 | 1.3254181 | 6.8396541 | 0.0013752 | -2.791610 | -2.4833462 | -0.3576484 | 0.9294933 | -0.5087295 | 4 | -8.619979 | 4.4538268 |
| ctrl_AAACATACCATGCA-1 | 0.5971309 | -2.504692 | -5.7053623 | 24.397053 | -2.3904987 | 2.201386 | -1.2395962 | 5.4981173 | 5.9326230 | -4.5632370 | -3.0731161 | -4.524647 | 7.6711034 | -6.0692864 | -0.1240446 | -1.0297346 | 6 | 6.976210 | -4.5865604 |
| ctrl_AAACATACCTCGCT-1 | -23.8472314 | 3.908961 | 0.0063302 | -3.403583 | -2.7578784 | -4.252570 | 3.6339812 | -0.6873898 | -1.4754320 | -1.5116271 | 1.1132268 | 0.461210 | 5.5208243 | -5.4599143 | -2.9389376 | -2.7597924 | 2 | -9.583503 | 1.6212997 |
In the UMAP plots below, the cells are colored by their PC score for each respective principal component. Let’s take a quick look at the top 16 PCs:
# Initialize empty list to store plots
plots <- list()
# Iterate over each PC
for (pc in paste0("PC_", 1:16)) {
# x,y coordinates are UMAP values
p <- ggplot(pc_data,
aes(x = umap_1, y = umap_2)) +
geom_point(aes(color = .data[[pc]]),
alpha = 0.7) +
# Color scale
scale_color_gradient(low = "grey90",
high = "blue") +
# Cluster label
geom_text(data = umap_label,
aes(x = x, y = y,
label = integrated_snn_res.0.8),
color = "black") +
# Formatting
theme_bw() +
theme(legend.position = "none") +
ggtitle(pc)
# Store plot in list
plots[[pc]] <- p
}
# Tile each plot into one figure
plot_grid(plotlist = plots, ncol = 4)
# Number of PCs to plot
n_pcs = 16
# Add PC score columns to adata.obs
for pc_ix in range(n_pcs):
adata_integrated.obs[f"PC{pc_ix+1}_score"] = adata_integrated.obsm["X_pca"][:, pc_ix]
# Create 4x4 grid
fig, axes = plt.subplots(4, 4, figsize = (16, 16))
for ix in range(n_pcs):
row, col = divmod(ix, 4)
ax = axes[row, col]
sc.pl.embedding(
adata_integrated,
color = f"PC{ix+1}_score",
ax = ax,
show = False,
title = f"PC{ix+1}",
basis = "umap_scvi")
plt.show()
We can see how the clusters are represented by the different PCs. Recall that we can identify which genes are driving each principal component to begin characterizing each cluster.
For instance, the genes driving PC_2 exhibit higher expression in most clusters except 9 and 12.
# UMAP of PC2 scores
plots[["PC_2"]]
We could look back at our genes driving this PC to get an idea of what the cell types might be:
# Top and bottom genes for PCs
print(seurat_integrated[["pca"]], dims = 1:5, nfeatures = 5)PC_ 1
Positive: RPL3, RPL13, RPS6, RPS18, RPL10
Negative: FTL, TIMP1, FTH1, C15orf48, CXCL8
PC_ 2
Positive: CD74, IGHM, HLA-DRA, IGKC, CD79A
Negative: GNLY, CCL5, NKG7, GZMB, FGFBP2
PC_ 3
Positive: TRAC, FTL, CCL2, S100A8, PABPC1
Negative: CD74, HLA-DRA, IGKC, IGHM, HLA-DRB1
PC_ 4
Positive: HSPB1, CACYBP, HSPA8, HSP90AB1, HSPH1
Negative: CD74, CCL5, GNLY, IGHM, NKG7
PC_ 5
Positive: VMO1, FCGR3A, MS4A7, TIMP1, TNFSF10
Negative: CCL2, CXCL8, FTL, S100A8, S100A9 With the GNLY and NKG7 genes as negative markers of PC_2, we can hypothesize that clusters 9 and 12 correspond to NK cells. This just hints at what the clusters identity could be, with the identities of the clusters being determined through a combination of the PCs.
For instance, the genes driving PC_3 exhibit higher expression in most clusters except 8 and 9.
# UMAP of PC3 and cluster scores
sc.pl.embedding(
adata_integrated,
color = ["PC3_score", "leiden_0.8"],
legend_loc = "on data",
basis = "umap_scvi")
We could look back at our genes driving this PC to get an idea of what the cell types might be:
# Top and bottom genes for PCs
sc.pl.pca_loadings(adata_integrated,
components = "1,2,3")
With the GNLY and NKG7 genes as negative markers of PC_3, we can hypothesize that clusters 8 and 9 correspond to NK cells. This just hints at what the clusters identity could be, with the identities of the clusters being determined through a combination of the PCs.
To truly determine the identity of the clusters and whether the resolution is appropriate, it is helpful to explore a handful of known gene markers for the cell types expected.
With the cells clustered, we can explore the cell type identities by looking for known markers. From the literature, for a PBMC dataset, we know the following genes correspond to these immune cell types:
| Cell Type | Marker |
|---|---|
| CD14+ monocytes | CD14, LYZ |
| FCGR3A+ monocytes | FCGR3A, MS4A7 |
| Conventional dendritic cells | FCER1A, CST3 |
| Plasmacytoid dendritic cells | IL3RA, GZMB, SERPINF1, ITM2C |
| B cells | CD79A, MS4A1 |
| T cells | CD3D |
| CD4+ T cells | CD3D, IL7R, CCR7 |
| CD8+ T cells | CD3D, CD8A |
| NK cells | GNLY, NKG7 |
| Megakaryocytes | PPBP |
| Erythrocytes | HBB, HBA2 |
Depending on our markers of interest, they could be positive or negative markers for a particular cell type. The combined expression of our chosen handful of markers should give us an idea on whether a cluster corresponds to that particular cell type.
# UMAP of clusters
DimPlot(object = seurat_integrated,
reduction = "umap",
label = TRUE) + NoLegend()
To access the normalized expression levels of all genes, we can use the normalized count data stored in the RNA assay slot.
The SCTransform normalization and integration was performed only on the 3000 most variable genes, so many of our genes of interest may not be present in this data.
dim(seurat_integrated[["RNA"]])[1] 14065 29629dim(seurat_integrated[["integrated"]])[1] 3000 29629# Select the RNA counts slot to be the default assay
DefaultAssay(seurat_integrated) <- "RNA"
# Normalize RNA data for visualization purposes
seurat_integrated <- NormalizeData(seurat_integrated,
verbose = FALSE)
seurat_integratedAn object of class Seurat
31130 features across 29629 samples within 3 assays
Active assay: RNA (14065 features, 2000 variable features)
3 layers present: scale.data, data, counts
2 other assays present: SCT, integrated
2 dimensional reductions calculated: pca, umapAssay is a slot defined in the Seurat object, it has multiple slots within it. In a given assay, the counts slot stores non-normalized raw counts, and the data slot stores normalized expression data. Therefore, when we run the NormalizeData() function in the above code, the normalized data will be stored in the data slot of the RNA assay while the counts slot will remain unaltered.
# UMAP of clusters
sc.pl.embedding(
adata_integrated,
color = "leiden_0.8",
legend_loc = "on data",
basis = "umap_scvi")
For the markers used here, we are looking for positive markers and consistency of expression of the markers across the clusters. For example, if there are two markers for a cell type and only one of them is expressed in a cluster - then we cannot reliably assign that cluster to the cell type.
We can utilize the UMAP plotting functions of these known genes to explore the expression of known gene markers in each cluster. Let us go through and start determining the identites of the clusters.
FeaturePlot(seurat_integrated,
reduction = "umap",
features = c("CD14", "LYZ"),
order = TRUE,
min.cutoff = "q10",
label = TRUE)
FeaturePlot() of top CD14+ monocyte markers.
CD14+ monocytes appear to correspond to clusters 2 and 4. We wouldn’t include clusters 10 and 13 because they do not highly express both of these markers.
sc.pl.embedding(adata_integrated,
color = ["leiden_0.8",
"CD14", "LYZ"],
basis = "umap_scvi",
legend_loc = "on data",
ncols = 2)
FeaturePlot() of top CD14+ monocyte markers.
CD14+ monocytes appear to correspond to clusters 2. We wouldn’t include clusters 3 and 12 because they do not highly express both of these markers.
FeaturePlot(seurat_integrated,
reduction = "umap",
features = c("FCGR3A", "MS4A7"),
order = TRUE,
min.cutoff = "q10",
label = TRUE)
FeaturePlot() of top FCGR3A+ monocyte markers.
FCGR3A+ monocytes markers distinctly highlight cluster 10, although we do see some decent expression in clusters 1 and 3 We would like to see additional markers for FCGR3A+ cells show up when we perform the marker identification.
sc.pl.embedding(adata_integrated,
color = ["leiden_0.8",
"FCGR3A", "MS4A7"],
basis = "umap_scvi",
legend_loc = "on data",
ncols = 2)
FeaturePlot() of top FCGR3A+ monocyte markers.
FCGR3A+ monocytes markers distinctly highlight cluster 13.
FeaturePlot(seurat_integrated,
reduction = "umap",
features = c("MARCO", "ITGAM", "ADGRE1"),
order = TRUE,
min.cutoff = "q10",
label = TRUE)
FeaturePlot() of top FCGR3A+ Macrophages markers.
sc.pl.embedding(adata_integrated,
color = ["leiden_0.8",
"MARCO", "ITGAM", "ADGRE1"],
basis = "umap_scvi",
legend_loc = "on data",
ncols = 2)
FeaturePlot() of top FCGR3A+ Macrophages markers.
We don’t see much overlap of our markers, so no clusters appear to correspond to macrophages; perhaps cell culture conditions negatively selected for macrophages (more highly adherent). To clearly see the expression levels of these genes, we can generate a violin plot of these genes see averages and trends of expression for our marker genes.
VlnPlot(seurat_integrated,
c("MARCO", "ITGAM", "ADGRE1"),
ncol = 1)
sc.pl.violin(adata_integrated,
keys = ["MARCO", "ITGAM", "ADGRE1"],
groupby = "leiden_0.8")
FeaturePlot(seurat_integrated,
reduction = "umap",
features = c("FCER1A", "CST3"),
order = TRUE,
min.cutoff = "q10",
label = TRUE)
FeaturePlot() of top Conventional dendritic cell markers.
The markers corresponding to conventional dendritic cells identify cluster 13 (both markers consistently show expression).
VlnPlot(seurat_integrated,
c("FCER1A", "CST3"),
ncol = 1)
sc.pl.embedding(adata_integrated,
color = ["leiden_0.8",
"FCER1A", "CST3"],
basis = "umap_scvi",
legend_loc = "on data",
ncols = 2)
The markers corresponding to conventional dendritic cells identify cluster 3 (both markers consistently show expression).
FeaturePlot(seurat_integrated,
reduction = "umap",
features = c("IL3RA", "GZMB", "SERPINF1", "ITM2C"),
order = TRUE,
min.cutoff = "q10",
label = TRUE)
FeaturePlot() of top Plasmacytoid dendritic cell markers.
Plasmacytoid dendritic cells represent cluster 16. While there are a lot of differences in the expression of these markers, we see cluster 16 (though small) is consistently strongly expressed.
sc.pl.embedding(adata_integrated,
color = ["leiden_0.8",
"IL3RA", "GZMB", "SERPINF1", "ITM2C"],
basis = "umap_scvi",
legend_loc = "on data",
ncols = 2)
FeaturePlot() of top Plasmacytoid dendritic cell markers.
Plasmacytoid dendritic cells represent cluster 5. While there are a lot of differences in the expression of these markers, we see cluster 5 (though small) is consistently strongly expressed. An alternative visualization that makes expression of smaller populations more visible are known as dotplots.
An alternative visualization that makes expression of smaller populations more visible are known as dotplots.
Dotplots are a built-in visualization tool which allows us to view the average expression of genes across clusters. This function additionally shows us how many cells within the cluster have expression of one gene. As input, we supply a list of genes - note that we cannot use the same gene twice or an error will be thrown.
# List of known celltype markers
markers <- list()
markers[["CD14+ monocytes"]] <- c("CD14", "LYZ")
markers[["FCGR3A+ monocyte"]] <- c("FCGR3A", "MS4A7")
markers[["Macrophages"]] <- c("MARCO", "ITGAM", "ADGRE1")
markers[["Conventional dendritic"]] <- c("FCER1A", "CST3")
markers[["Plasmacytoid dendritic"]] <- c("IL3RA", "GZMB", "SERPINF1", "ITM2C")
# Create dotplot based on RNA expression
DotPlot(seurat_integrated, markers, assay = "RNA")
# List of known celltype markers
markers = {
"CD14+ monocytes": ["CD14", "LYZ"],
"FCGR3A+ monocyte": ["FCGR3A", "MS4A7"],
"Macrophages": ["MARCO", "ITGAM", "ADGRE1"],
"Conventional dendritic": ["FCER1A", "CST3"],
"Plasmacytoid dendritic": ["IL3RA", "GZMB", "SERPINF1", "ITM2C"]}
sc.pl.dotplot(adata_integrated,
markers,
groupby = "leiden_0.8")
Having more marker genes per cell type is a great way to bolster confidence in the assignments being made.
| Cell Type | Clusters |
|---|---|
| CD14+ monocytes | ? |
| FCGR3A+ monocytes | ? |
| Conventional dendritic cells | ? |
| Plasmacytoid dendritic cells | ? |
| Macrophages | - |
| B cells | ? |
| T cells | ? |
| CD4+ T cells | ? |
| CD8+ T cells | ? |
| NK cells | ? |
| Megakaryocytes | ? |
| Erythrocytes | ? |
| Unknown | ? |
If any cluster appears to contain two separate cell types, it’s helpful to increase our clustering resolution to properly subset the clusters. Alternatively, if we still can’t separate out the clusters using increased resolution, then it’s possible that we had used too few principal components such that we are just not separating out these cell types of interest. To inform our choice of PCs, we could look at our PC gene expression overlapping the UMAP plots and determine whether our cell populations are separating by the PCs included.
Now we have a decent idea as to the cell types corresponding to the majority of the clusters, but some questions remain:
Marker identification analysis can help us address all of these questions!!
The next step will be to perform marker identification analysis, which will output the genes that significantly differ in expression between clusters. Using these genes we can determine or improve confidence in the identities of the clusters/subclusters.