Approximate time: 45 minutes
Learning Objectives
- Annotate a VCF file for functional impacts with
SnpEff - Differentiate between an unannotated and annotated VCF file
Variant Annotation
Now that we have a filtered VCF file for our samples, we want to annotate those variants to figure out what impacts they could have on our samples. Information we might be interested in knowing:
- Which genes are the variants we see are located in
- Where in the gene model do these variants reside (5’ UTR, coding sequence, etc.)
- How do these variants impact the gene model (creating a premature stop codon, silent mutation, etc.)
In order to do these types of analyses, we have to merge our variants with annotated transcript information and we will use SnpEff to do this. SnpEff is extremely fast and also is bundled with SnpSift, which we will use downstream to prioritize our variants.

SnpEff
SnpEff uses transcriptome annotations to predict the functional impacts of mutations in a VCF file and will modify the INFO field of the VCF file to carry the predicted functional impacts.
Searching for SnpEff Databases
The first step in annotating your VCF file is finding the appropriate SnpEff database to use so that the annotations are consistent with your version of the reference genome. These databases hold the gene model information that is critical for annotating variants. There are two paths for getting a SnpEff database for your analysis:
SnpEffhas tens of thousands of genome databases pre-built that you can use and they represent many publicly availible genomes. We will be using a pre-built database.- In the rare case that your genome is not represented, you can build one to use by following the instructions here. Unless you are working with a rare organism or an unpublished reference genome, it is highly unlikely that you will need to build the database yourself.
To see if your genome of interest is in the SnpEff database, we first need to load the SnpEff module:
module load snpEff/4.3g
With the SnpEff module loaded, let’s use the following command to browse all of the currently available genomes:
java -jar $SNPEFF/snpEff.jar databases | less
The first column is the database name and the second column in the Genus_species for the organism. There is also a database download link where the database can be downloaded at but this can be ignored as SnpEff will automatically download the database if needed. As you can see there are tens of thousands of these pre-built databases. So let’s exit the less buffer page and see which GRCh databases are available:
java -jar $SNPEFF/snpEff.jar databases | grep "GRCh"
We can see that this build of SnpEff has five possible GRCh databases that we can use for annotation, including one for GRCh38.p7 called GRCh38.p7.RefSeq. Now that we have found the database that we would like to use for our analysis, we can run SnpEff.
Running SnpEff
Before we get into SnpEff we need to discuss cancer-mode in SnpEff. In order to run SnpEff in cancer-mode, we need to do two things:
1) Understand what cancer-mode is
2) Format our VCF file accordingly to accommodate for cancer-mode
Understanding Cancer-mode
There can be loci in the genome where, due to variation in the population, an individual’s germline alleles differs from the reference sequence. Furthermore, if a somatic mutation happens at one of these loci, then from SnpEff’s perspective the mutational event will look like a change from the reference allele to the somatic mutant rather than a change from the normal sample allele to the the somatic mutant. SnpEff’s cancer-mode is designed to address this. The illustration below shows an example of this case.
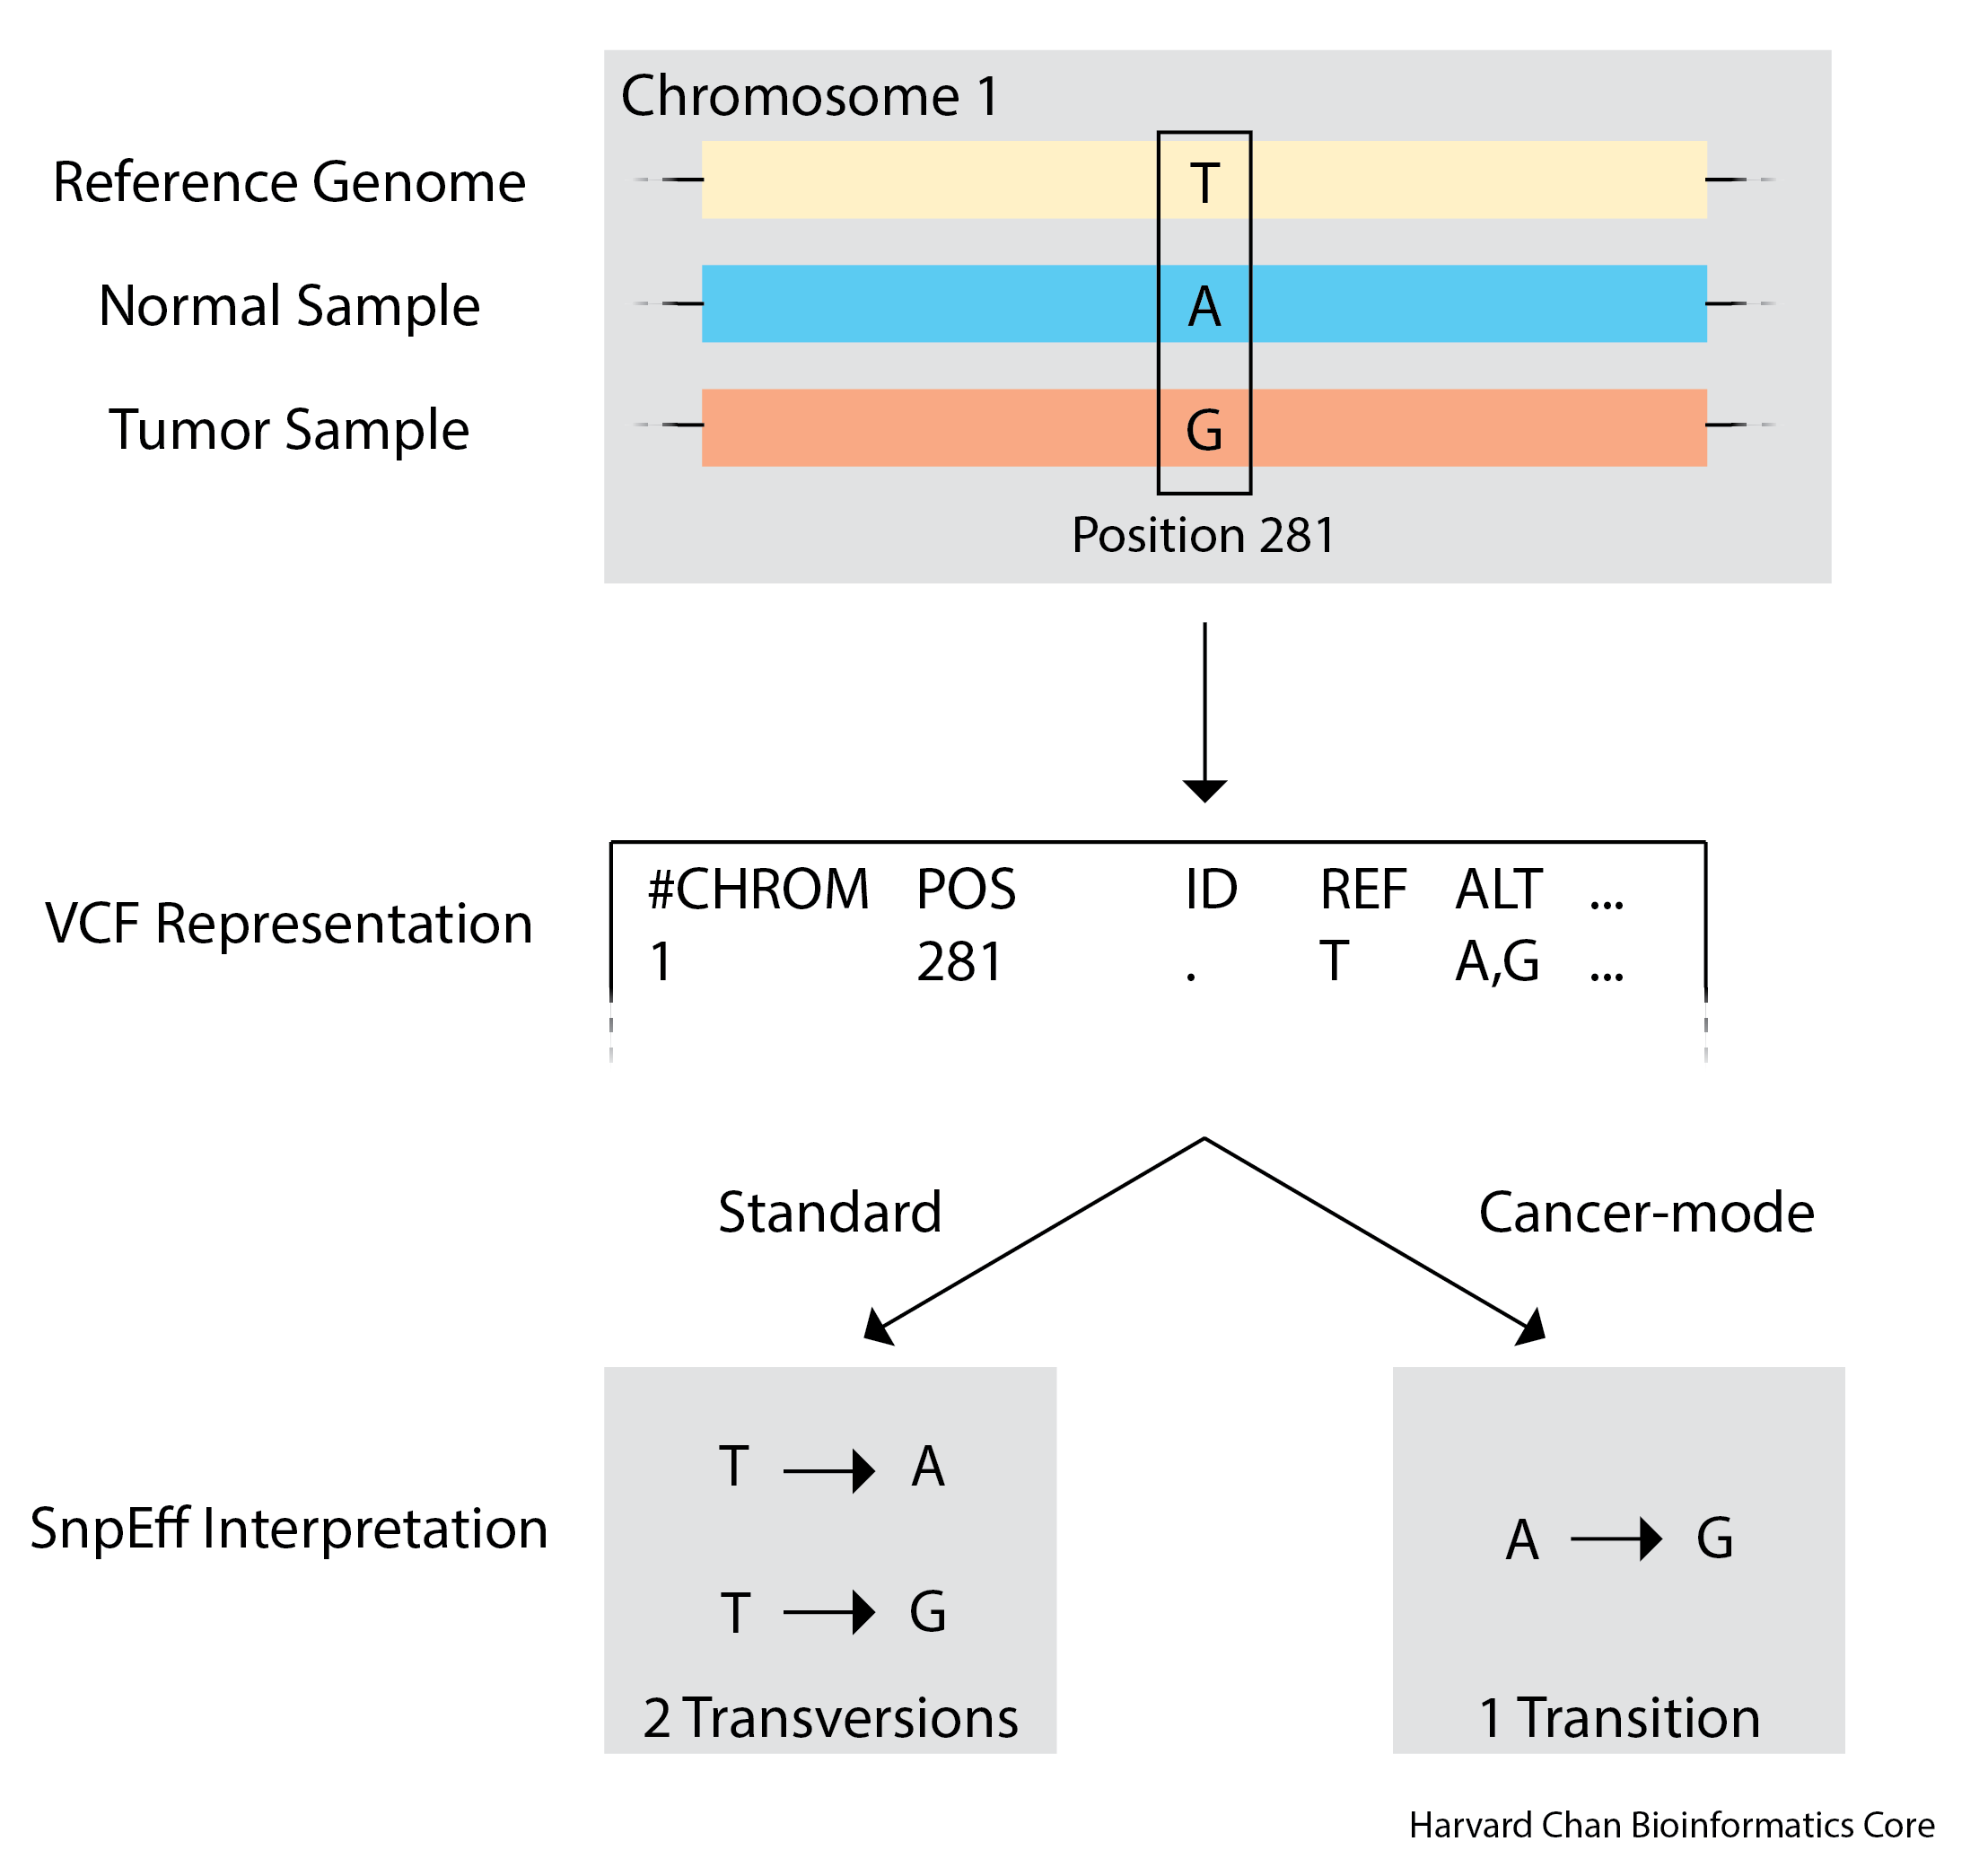
A more detailed explaination of SnpEff’s cancer-mode can be found on their website.
Setting up Cancer-mode
In order to run cancer-mode, we will need to append to our VCF file an additional header line that contains information that SnpEff can use when determining, which sample is the normal sample and which sample is the tumor sample. To append the header lines we will be using a package within bcftools. First, move to your scripts directory and create a new file named syn3_normal_syn3_tumor_pedigree_header.txt using vim:
cd ~/variant_calling/scripts/
vim syn3_normal_syn3_tumor_pedigree_header.txt
Once inside this file, we just need to add this text to the file:
##PEDIGREE=<Derived=syn3_tumor,Original=syn3_normal>
This text will act as the additional header information that we need to add. Then save and exit the file.
Next, we can start writing our sbatch submission script named variant_annotation_normal_tumor.sbatch using vim:
vim variant_annotation_normal_tumor.sbatch
Once inside insert mode, can can enter the shebang line, description and SBATCH directives:
#!/bin/bash
# Using SnpEff to annotate our variants

# Assign sbatch directives
#SBATCH -p priority
#SBATCH -t 0-02:00:00
#SBATCH -c 1
#SBATCH --mem 8G
#SBATCH -o variant_annotation_syn3_normal_syn3_tumor_%j.out
#SBATCH -e variant_annotation_syn3_normal_syn3_tumor_%j.err
Next, we will add the line to load the modules that we will need:
# Load modules
module load gcc/9.2.0
module load bcftools/1.14
module load snpEff/4.3g
Also, we will add our variables:
# Assign variables
REPORTS_DIRECTORY=/home/$USER/variant_calling/reports/snpeff/
SAMPLE_NAME=mutect2_syn3_normal_syn3_tumor
REFERENCE_SEQUENCE_NAME=GRCh38.p7
CSV_STATS=`echo -e "${REPORTS_DIRECTORY}annotation_${SAMPLE_NAME}_${REFERENCE_SEQUENCE_NAME}-effects-stats.csv"`
HTML_REPORT=`echo -e "${REPORTS_DIRECTORY}annotation_${SAMPLE_NAME}_${REFERENCE_SEQUENCE_NAME}-effects-stats.html"`
REFERENCE_DATABASE=GRCh38.p7.RefSeq
DATADIR=/n/groups/hbctraining/variant_calling/reference/snpeff/data/
FILTERED_VCF_FILE=/n/scratch/users/${USER:0:1}/${USER}/variant_calling/vcf_files/${SAMPLE_NAME}_${REFERENCE_SEQUENCE_NAME}-pass-filt-LCR.vcf
PEDIGREE_HEADER_FILE=/home/$USER/variant_calling/scripts/syn3_normal_syn3_tumor_pedigree_header.txt
FILTERED_VCF_FILE_WITH_PEDIGREE_HEADER=${FILTERED_VCF_FILE%.vcf}.pedigree_header.vcf
SNPEFF_ANNOTATED_VCF_FILE=${FILTERED_VCF_FILE_WITH_PEDIGREE_HEADER%.vcf}.snpeff.vcf
DBSNP_DATABASE=/n/groups/hbctraining/variant_calling/reference/GRCh38.p7.dbSNP.vcf.gz
DBSNP_ANNOTATED_VCF_FILE=${SNPEFF_ANNOTATED_VCF_FILE%.vcf}.dbSNP.vcf
Next, we need to create a directory to hold our reports:
# Create reports directory
mkdir -p $REPORTS_DIRECTORY
Now, we can add our bcftools command to append the header line required for cancer-mode in SnpEff to our VCF file:
# Append Header
bcftools annotate \
  --header-lines $PEDIGREE_HEADER_FILE \
  $FILTERED_VCF_FILE \
  > $FILTERED_VCF_FILE_WITH_PEDIGREE_HEADER
Here is what each part of that command does:
bcftools annotateThis calls theannotatefunction withinbcftools--header-lines $PEDIGREE_HEADER_FILEThis is the header information that we want to append to the end of the VCF file’s header lines$FILTERED_VCF_FILEThis is our input VCF file without the appended header> $FILTERED_VCF_FILE_WITH_PEDIGREE_HEADERThis is the output file with the appended header
Next, we need to add our SnpEff command:
# Run SnpEff
java -jar -Xmx4g $SNPEFF/snpEff.jar  eff \
  -dataDir $DATADIR \
  -cancer \
  -noLog \
  -csvStats $CSV_STATS \
  -s $HTML_REPORT \
  $REFERENCE_DATABASE \
  $FILTERED_VCF_FILE_WITH_PEDIGREE_HEADER \
  > $SNPEFF_ANNOTATED_VCF_FILE
Let’s breakdown this command and discuss each argument:
java -jar $SNPEFF/snpEff.jar effSnpeffThis calls theeffpackage withinSnpEffto annotate variants.-dataDir $DATADIRThis is the path to the data directory that holds theSnpEffannotations-cancerPerforms cancer-mode-noLogThis does not report command usage toSnpEff’s server-csvStats $CSV_STATSThis produces a flat-text file with summary statistics regarding the variants annotated. (Optional)-s $HTML_REPORTThis creates an HTML file with summary statistics regarding the variants annotated. This HTML file is mostly just an HTML stylized version of the CSV file above. (Optional)$REFERENCE_DATABASEThis is theSnpEffdatabase we are going to use for the annotation.$FILTERED_VCF_FILE_WITH_PEDIGREE_HEADERThis is the input VCF file to be annotated> $SNPEFF_ANNOTATED_VCF_FILEThe output ofSnpEffwill be redirected into this VCF file.
Annotate SNPs with dbSNP
dbSNP is a public-domain archive maintained by NCBI for simple genetic polymorphisms in humans. It is designed as a repository for researchers to be able to submit novel variants to as well as query for variants submitted by others. The variants within dbSNP include:
- SNPs
- Small-scale insertions/deletions
- Microsatellite repeat variations
- Retrotransposable element insertions
![]()
In addition to adding the annotations that SnpEff provides regarding types of mutations, we can also add annotations from dbSNP regarding our variants. These annotations will add lots of information to the INFO field, but it will also populate the ID field in the VCF file with the dbSNP ID for each variant, if it exists. In order to do these annotations, we need to have access to a dbSNP VCF file with the annotations along with an index of the VCF file (a .tbi file). Note, that we have already created these files for you.
Click here to see how to obtain the dbSNP VCF file and how to index it
The first step is that we need to download out dbSNP VCF file from the NCBI FTP site. We can do this with acurl command like:
# YOU DO NOT NEED TO DO THIS
curl -o GRCh38.p7.dbSNP.vcf.gz -L https://ftp.ncbi.nih.gov/snp/organisms/human_9606_b151_GRCh38p7/VCF/00-All.vcf.gz
We used the
curl command earlier when demonstrating how you could download the LCR BED file. But as a refresher, we can breakdown this command:
curlThis calls thecurloption-o GRCh38.p7.dbSNP.vcf.gzThis tellscurlwhat we want the downloaded file to be named-L https://ftp.ncbi.nih.gov/snp/organisms/human_9606_b151_GRCh38p7/VCF/00-All.vcf.gzThis is the linked file we want to download
SnpSift, it does speed up the annotation. Importantly, bcftools DOES REQUIRE this index file and it also will require files that are indexed to also be compressed in .gz format. As a result we are going to leave, our file GRCh38.p7.dbSNP.vcf.gz compressed because:
- There is no need to uncompress it
- It will take up more space on the cluster if we do uncompress it
- Both
SnpSiftandbcftoolscan work from the compressed version
tabix, which is part of the HTSlib module. First, we will need to load the HTSlib module, which also requires us to load the gcc module as well:
module load gcc/9.2.0
module load htslib/1.14
In order to index our dbSNP file using
tabix, we just need to run the following command:
# YOU DO NOT NEED TO DO THIS
tabix GRCh38.p7.dbSNP.vcf.gz
We can break down this command as:
tabixThis is the command we use to calltabixGRCh38.p7.dbSNP.vcf.gzThis is the VCF file we want to index.
GRCh38.p7.dbSNP.vcf.gz.tbi file in addition to our GRCh38.p7.dbSNP.vcf.gz file.
We will be implementing these dbSNP annotations by using SnpSift, which is part of the SnpEff package.
Let’s go ahead and add the SnpSift line that we are going to use to annotate our VCF file:
# Use dbSNP VCF to annotate our VCF
java -jar $SNPEFF/SnpSift.jar annotate \
  $DBSNP_DATABASE \
  -tabix \
  -noLog \
  $SNPEFF_ANNOTATED_VCF_FILE \
  > $DBSNP_ANNOTATED_VCF_FILE
Let’s discuss each part of this command:
java -jar $SNPEFF/SnpSift.jar annotateThis calls theannotatefunction within theSnpSiftpackage$DBSNP_DATABASEThis is the dbSNP database that we want to use for annotations- We had set this variable earlier in the lesson to point to the database we had created for you
DBSNP_DATABASE=/n/groups/hbctraining/variant_calling/reference/GRCh38.p7.dbSNP.vcf.gz
- We had set this variable earlier in the lesson to point to the database we had created for you
-tabixThis is lettingSnpSiftknow that the dbSNP database has a VCF index that it can use to speed up the annotation-noLogThis does not report command usage toSnpEff’s server$SNPEFF_ANNOTATED_VCF_FILEThis is the input VCF file we want to be annotated> $DBSNP_ANNOTATED_VCF_FILEThis is the dbSNP annotated output VCF file
Click here to see how to annotate our VCF file with the dbSNP annotation in bcftools
The first thing we are going to need to do is load the modules that we will be using:module load gcc/9.2.0 module load bcftools/1.14Assuming we have already indexed our dbSNP VCF file, the first thing that we are going to need to do is compress the VCF file that we wish to annotate with:
gzip -c $SNPEFF_ANNOTATED_VCF_FILE > ${SNPEFF_ANNOTATED_VCF_FILE}.gz
Let's talk about this command:gzipThis calls the function we are going to use for the compression-cThis is an option that keeps the original file. Otherwise, when the compression happens, the uncompressed file is removed$SNPEFF_ANNOTATED_VCF_FILEThis is the file that we want to compress> ${SNPEFF_ANNOTATED_VCF_FILE}.gzThis is the compressed output file
Now we are ready to annotate the VCF file with the dbSNP annotations. The command to do so is:
bcftools annotate \
  -a $DBSNP_DATABASE \
  -c ID,INFO \
  -O v \
  -o $DBSNP_ANNOTATED_VCF_FILE \
  ${SNPEFF_ANNOTATED_VCF_FILE}.gz
Let's explain each part of this command:
bcftools annotateThis calls theannotatefunction withinbcftools-a $DBSNP_DATABASEThis provides the dbSNP VCF to use for the annotations-c ID,INFOThese are the fileds we would like to add information to from our dbSNP file-O vThis is the output format. The options for this are:Abbreviation Output Format b Compressed BCF file u Uncompressed BCF file z Compressed VCF file v Uncompressed VCF file -o $DBSNP_ANNOTATED_VCF_FILEThis is the dbSNP annotated output VCF file${SNPEFF_ANNOTATED_VCF_FILE}.gzThis is the input VCF file
Click here to see what our final sbatchcode script for annotating our variants should look like
#!/bin/bash
# Using SnpEff to annotate our variants

# Assign sbatch directives
#SBATCH -p priority
#SBATCH -t 0-02:00:00
#SBATCH -c 1
#SBATCH --mem 8G
#SBATCH -o variant_annotation_syn3_normal_syn3_tumor_%j.out
#SBATCH -e variant_annotation_syn3_normal_syn3_tumor_%j.err

# Load modules
module load gcc/9.2.0
module load bcftools/1.14
module load snpEff/4.3g

# Assign variables
REPORTS_DIRECTORY=/home/$USER/variant_calling/reports/snpeff/
SAMPLE_NAME=mutect2_syn3_normal_syn3_tumor
REFERENCE_SEQUENCE_NAME=GRCh38.p7
CSV_STATS=`echo -e "${REPORTS_DIRECTORY}annotation_${SAMPLE_NAME}_${REFERENCE_SEQUENCE_NAME}-effects-stats.csv"`
HTML_REPORT=`echo -e "${REPORTS_DIRECTORY}annotation_${SAMPLE_NAME}_${REFERENCE_SEQUENCE_NAME}-effects-stats.html"`
REFERENCE_DATABASE=GRCh38.p7.RefSeq
DATADIR=/n/groups/hbctraining/variant_calling/reference/snpeff/data/
FILTERED_VCF_FILE=/n/scratch/users/${USER:0:1}/${USER}/variant_calling/vcf_files/${SAMPLE_NAME}_${REFERENCE_SEQUENCE_NAME}-pass-filt-LCR.vcf
PEDIGREE_HEADER_FILE=/home/$USER/variant_calling/scripts/syn3_normal_syn3_tumor_pedigree_header.txt
FILTERED_VCF_FILE_WITH_PEDIGREE_HEADER=${FILTERED_VCF_FILE%.vcf}.pedigree_header.vcf
SNPEFF_ANNOTATED_VCF_FILE=${FILTERED_VCF_FILE_WITH_PEDIGREE_HEADER%.vcf}.snpeff.vcf
DBSNP_DATABASE=/n/groups/hbctraining/variant_calling/reference/GRCh38.p7.dbSNP.vcf.gz
DBSNP_ANNOTATED_VCF_FILE=${SNPEFF_ANNOTATED_VCF_FILE%.vcf}.dbSNP.vcf

# Create reports directory
mkdir -p $REPORTS_DIRECTORY

# Append Header
bcftools annotate \
  --header-lines $PEDIGREE_HEADER_FILE \
  $FILTERED_VCF_FILE \
  > $FILTERED_VCF_FILE_WITH_PEDIGREE_HEADER

# Run SnpEff
java -jar -Xmx4g $SNPEFF/snpEff.jar  eff \
  -dataDir $DATADIR \
  -cancer \
  -noLog \
  -csvStats $CSV_STATS \
  -s $HTML_REPORT \
  $REFERENCE_DATABASE \
  $FILTERED_VCF_FILE_WITH_PEDIGREE_HEADER \
  > $SNPEFF_ANNOTATED_VCF_FILE

# Use dbSNP VCF to annotate our VCF
java -jar $SNPEFF/SnpSift.jar annotate \
  $DBSNP_DATABASE \
  -tabix \
  -noLog \
  $SNPEFF_ANNOTATED_VCF_FILE \
  > $DBSNP_ANNOTATED_VCF_FILE
Submit this script using:
sbatch variant_annotation_normal_tumor.sbatch
Output
Let’s take a look at our output from SnpEff now to see how our VCF file has been modified to include variant annotations. Let’s open up our annotated VCF file in less:
less /n/scratch/users/${USER:0:1}/$USER/variant_calling/vcf_files/mutect2_syn3_normal_syn3_tumor_GRCh38.p7-pass-filt-LCR.pedigree_header.snpeff.dbSNP.vcf
Scroll down to right before your variants are and you will notice that SnpEff has inserted two lines into your VCF file. First, it has inserted:
##SnpEffVersion="4.3g (build 2016-11-28 08:31), by Pablo Cingolani"
This is just a bit of extra metadata on your VCF file letting you know the version of SnpEff that was used to generate this VCF file. While it is best practice to have your code for annotating a VCF file archived in a script like we have done, you could encounter a situation where you’ve either lost this script or you are analyzing someone else’s work and need to know which version of SnpEff they used and you can find it here.
##SnpEffCmd="SnpEff -cancer -csvStats /home/$USER/variant_calling/reports/snpeff/annotation_mutect2_syn3_normal_syn3_tumor_GRCh38.p7-effects-stats.csv -s /home/$USER/variant_calling/reports/snpeff/annotation_mutect2_syn3_normal_syn3_tumor_GRCh38.p7-effects-stats.html GRCh38.p7.RefSeq /n/scratch/users/${USER:0:1}/$USER/variant_calling/vcf_files/mutect2_syn3_normal_syn3_tumor_GRCh38.p7-pass-filt-LCR.pedigree_header.vcf "
This tells you the command that was used by SnpEff to create this SnpEff annotated file. Thus, between the aforementioned version line and this line, you should be able to reproduce the annotation of any SnpEff annotation as long as the annotation database is part of the built-in databases.
Let’s go ahead and compare the first entry of the filtered VCF file with the annotated VCF file:
Filtered VCF
1 1324300 . G A . PASS AS_FilterStatus=SITE;AS_SB_TABLE=47,6|11,0;ClippingRankSum=0.390;DP=68;ECNT=1;FS=2.373;GERMQ=93;MBQ=27,27;MFRL=337,338;MMQ=60,60;MPOS=27;MQ=60.00;MQ0=0;MQRankSum=0.000;NALOD=1.54;NLOD=9.88;POPAF=6.00;ReadPosRankSum=-0.125;TLOD=24.65 GT:AD:AF:DP:F1R2:F2R1:SB 0/0:33,0:0.028:33:12,0:20,0:32,1,0,0 0/1:20,11:0.367:31:6,6:12,5:15,5,11,0
Annotated VCF
1 1324300 . G A . PASS AS_FilterStatus=SITE;AS_SB_TABLE=47,6|11,0;ClippingRankSum=0.39;DP=68;ECNT=1;FS=2.373;GERMQ=93;MBQ=27,27;MFRL=337,338;MMQ=60,60;MPOS=27;MQ=60;MQ0=0;MQRankSum=0;NALOD=1.54;NLOD=9.88;POPAF=6;ReadPosRankSum=-0.125;TLOD=24.65;ANN=A|upstream_gene_variant|MODIFIER|CPTP|CPTP|transcript|NM_001029885.1|protein_coding||c.-2611G>A|||||463|,A|upstream_gene_variant|MODIFIER|CPTP|CPTP|transcript|XM_005244802.1|protein_coding||c.-3008G>A|||||456|,A|upstream_gene_variant|MODIFIER|CPTP|CPTP|transcript|XM_005244801.3|protein_coding||c.-2611G>A|||||843|,A|upstream_gene_variant|MODIFIER|CPTP|CPTP|transcript|XM_011542200.2|protein_coding||c.-2611G>A|||||1315|,A|intron_variant|MODIFIER|CPSF3L|CPSF3L|transcript|XM_011541647.1|protein_coding|1/18|c.28+281C>T||||||,A|intron_variant|MODIFIER|CPSF3L|CPSF3L|transcript|NM_001256456.1|protein_coding|1/18|c.-428+281C>T||||||,A|intron_variant|MODIFIER|CPSF3L|CPSF3L|transcript|NM_001256460.1|protein_coding|1/17|c.-167+281C>T||||||,A|intron_variant|MODIFIER|CPSF3L|CPSF3L|transcript|NM_001256462.1|protein_coding|1/14|c.28+281C>T||||||,A|intron_variant|MODIFIER|CPSF3L|CPSF3L|transcript|NM_001256463.1|protein_coding|1/14|c.28+281C>T||||||,A|intron_variant|MODIFIER|CPSF3L|CPSF3L|transcript|NM_017871.5|protein_coding|1/16|c.28+281C>T||||||,A|intron_variant|MODIFIER|CPSF3L|CPSF3L|transcript|XM_017001558.1|protein_coding|1/18|c.-438+281C>T||||||,A|intron_variant|MODIFIER|CPSF3L|CPSF3L|transcript|XM_017001557.1|protein_coding|1/17|c.-361+281C>T||||||,A|intron_variant|MODIFIER|CPSF3L|CPSF3L|transcript|XM_011541648.1|protein_coding|1/18|c.-91+281C>T||||||,A|intron_variant|MODIFIER|CPSF3L|CPSF3L|transcript|XM_011541650.1|protein_coding|1/16|c.-254+281C>T|||||| GT:AD:AF:DP:F1R2:F2R1:SB 0/0:33,0:0.028:33:12,0:20,0:32,1,0,0 0/1:20,11:0.367:31:6,6:12,5:15,5,11,0
You can see that the only difference between these files is that we have appended onto the INFO field. This appendage contains lots of information such as the type of modification it is, the gene symbol of the gene modified and the accession number of the transcript modified. Because gene models overlap, you may have a single variant that alters multiple transcript models. In this case, each alteration will be separated by a ,. We can also see that this SNP was not part of the dbSNP database that we had and thus it didn’t have its ID field annotated with its dbSNP ID.
Exercise
SnpEff generates an HTML report that gives a nice overview of the annotated variants. Use FileZilla to download the file called annotation_mutect2_syn3_normal_syn3_tumor_GRCh38.p7-effects-stats.html from your reports directory. If you have trouble, the report can also be downloaded from here. Use this HTML report to answer the following questions:
1) How many variants are in the VCF file?
2) Which chromosome had the most variants?
3) How many variants were missense variants?
Now that we have successfully annotated our variants, let’s talk about how we will use SnpSift to be able to prioritize our variants in the next lesson!
This lesson has been developed by members of the teaching team at the Harvard Chan Bioinformatics Core (HBC). These are open access materials distributed under the terms of the Creative Commons Attribution license (CC BY 4.0), which permits unrestricted use, distribution, and reproduction in any medium, provided the original author and source are credited.