Installing and using UMAP
To visualize the cell clusters, there are a few different dimensionality reduction techniques that can be helpful. The most popular methods include t-distributed stochastic neighbor embedding (t-SNE) and Uniform Manifold Approximation and Projection (UMAP) techniques.
In the Seurat package there is a function to use the UMAP visualization (RunUMAP()), however it does require the user to first install the umap-learn python package. To install this package follow the instructions below.
Getting Going with Python
These materials were modified from https://unidata.github.io/online-python-training/conda-windows.html.
The aim of this web page is to help you get started with Python. We will explain what a package management tool is, how to download conda package management tool via the Anaconda installer, and guide you on the Mac/Windows command prompt so that you can use conda from the command line. Finally, we will wrap up by installing one library with conda.
What Is a Package Management Tool?
A package management tool is a software application that helps you manage software libraries that enable you to get your work done. These software libraries may relate to plotting for scientific publication or accessing certain kinds of data, for example.
When you start using Python, you will want use software libraries that are not part of the standard Python installation. For example, we wish to use the umap-learn for cluster visualization. Anaconda from Continuum Analytics will help you install umap-learn easily.
Installing the conda Package Management Tool
Before we install conda, close your R and RStudio.
The conda package management tool is part of the Anaconda software package. Install conda by navigating to the Anaconda download page. Scroll down to choose a tab for the OS of your computer:

Download Python by clicking on the “64-bit Graphical Installer” link. It is a big download, so it is best to be on fast network. Open the installer file you just downloaded. It should be named something like Anaconda[version]-Windows-x86_64.
This action will guide you through the conda installation.
For Mac OS, the installation will automatically make Anaconda the default Python, which is great.
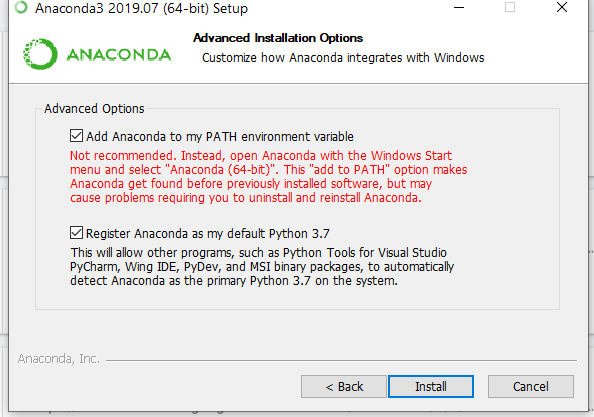
For Windows OS, the last step of the installation process will ask you if you want to add Anaconda to the PATH environment variable and whether you would like to make this your default Python. Ensure both options are checked.
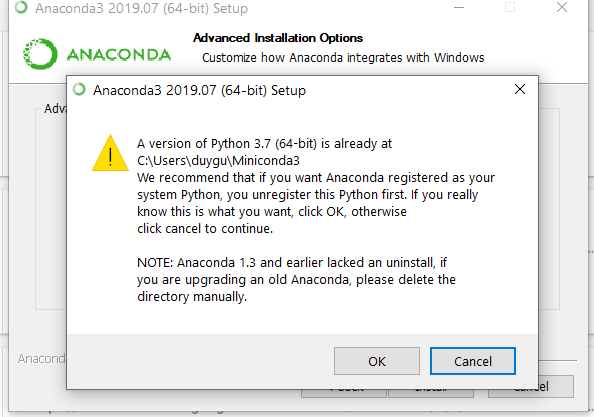
The following warning will also pop up on Windows if you have Miniconda3 or another python installed, to which you should select OK (unless you need this other python for other purposes):
Command prompt
Mac command prompt
Use Spotlight to search for the Terminal program. It would look something like: Janes-iMac:~ janedoe$. This is known as the command line. The command line is where you give text instructions to your computer.
Windows command prompt
The Windows Command Prompt, installed by the Anaconda program, is a software program giving you the ability to give text based instructions to your computer.
To open the Windows Command Prompt, left-click on the Windows Start menu located in the lower left portion of the desktop and search for ‘Command Prompt’ in the search box located at the bottom of the menu.
In the Windows Command Prompt, you will see some text such as C:\Users\Jane>. This is known as the command line. The command line is where you give text instructions to your computer.
Interacting with conda
Let’s make sure conda is installed by entering this instruction on the command line:
conda list
yields
# packages in environment at C:\Users\Jane\AppData\Local\Continuum\Anaconda3:
#
alabaster                 0.7.7                    py35_0
anaconda                  4.0.0               np110py35_0
anaconda-client           1.4.0                    py35_0
...
numexpr                   2.5                 np110py35_0
numpy                     1.10.4                   py35_0
odo                       0.4.2                    py35_0
...
yaml                      0.1.6                         0
zeromq                    4.1.3                         0
zlib                      1.2.8                         0
which will list linked packages in a conda environment. You’ll notice libraries such as the scientific computing library numpy that you will probably be making use of.
Install umap-learn with conda
We first have to give conda an instruction on where to find umap-learn on the conda-forge channel.
conda config --add channels conda-forge
We can now install umap-learn:
conda install -c conda-forge umap-learn
You should receive the warning:
The following packages will be SUPERCEDED by a higher priority channel:
    certifi
    conda
You will be asked y/n, and you should type y.
Let’s verify we installed umap-learn with the following command:
conda list
should yield amongst other libraries:
# packages in environment at /Users/Jane/anaconda:
#
...
umap-learn                     0.3.9                   py37_0    conda-forge
...
Now we can restart our R session, load our libraries, and continue with running the RunUMAP() function.
NOTE: If your R session crashes on a Mac OS, then you can try running the following in R:
library(reticulate)
use_python(python = "~/Anaconda3/bin/python", required = TRUE)
Then try to re-run the
RunUMAP().