Learning Objectives
In this lesson, you will:
- Upload an app to GitHub Pages using Shinylive
Why use Shinylive?
Oftentimes when you are distributing an app, you will need to upload it to a server like Posit Connect or Shinyapp.io. However, recently there has become an avenue for distributing Shiny apps without a server using a package called shinylive. This can work because places like GitHub run what is called “static webpages”. Static webpages don’t respond to user input. However, what shinylive does is it compiles your app in such a way that it is static from the server’s point of view and the computation for an app is done locally on a user’s browser rather than on a server. One disadvantage of this model is that your apps can only use the computationally power of the user’s computer, but for apps with a low memory need, this can be a viable option.
Pre-requisites
In order to do the following steps you will need a GitHub account. If you do not have a GitHub account, instructions to doingin so can be found here. You will also need two packages, shinylive and httpuv. You can install these with the following commands in your console:
install.packages("shinylive")
install.packages("httpuv")
You will need to load the libraries with:
library(shinylive)
library(httpuv)
We will also be using GitHub Desktop in this demo. If you feel comfortable using git from the command-line, then this is optional. GitHub has documentation on how to get set-up with GitHub Desktop. If you are going to use GitHub Desktop, be sure that you have downloaded it and gotten yourself set-up on GitHub Desktop.
If you have done all of this, then you are ready to upload your app to GitHub Pages using Shinylive!
Creating your app
Create an RStudio Project
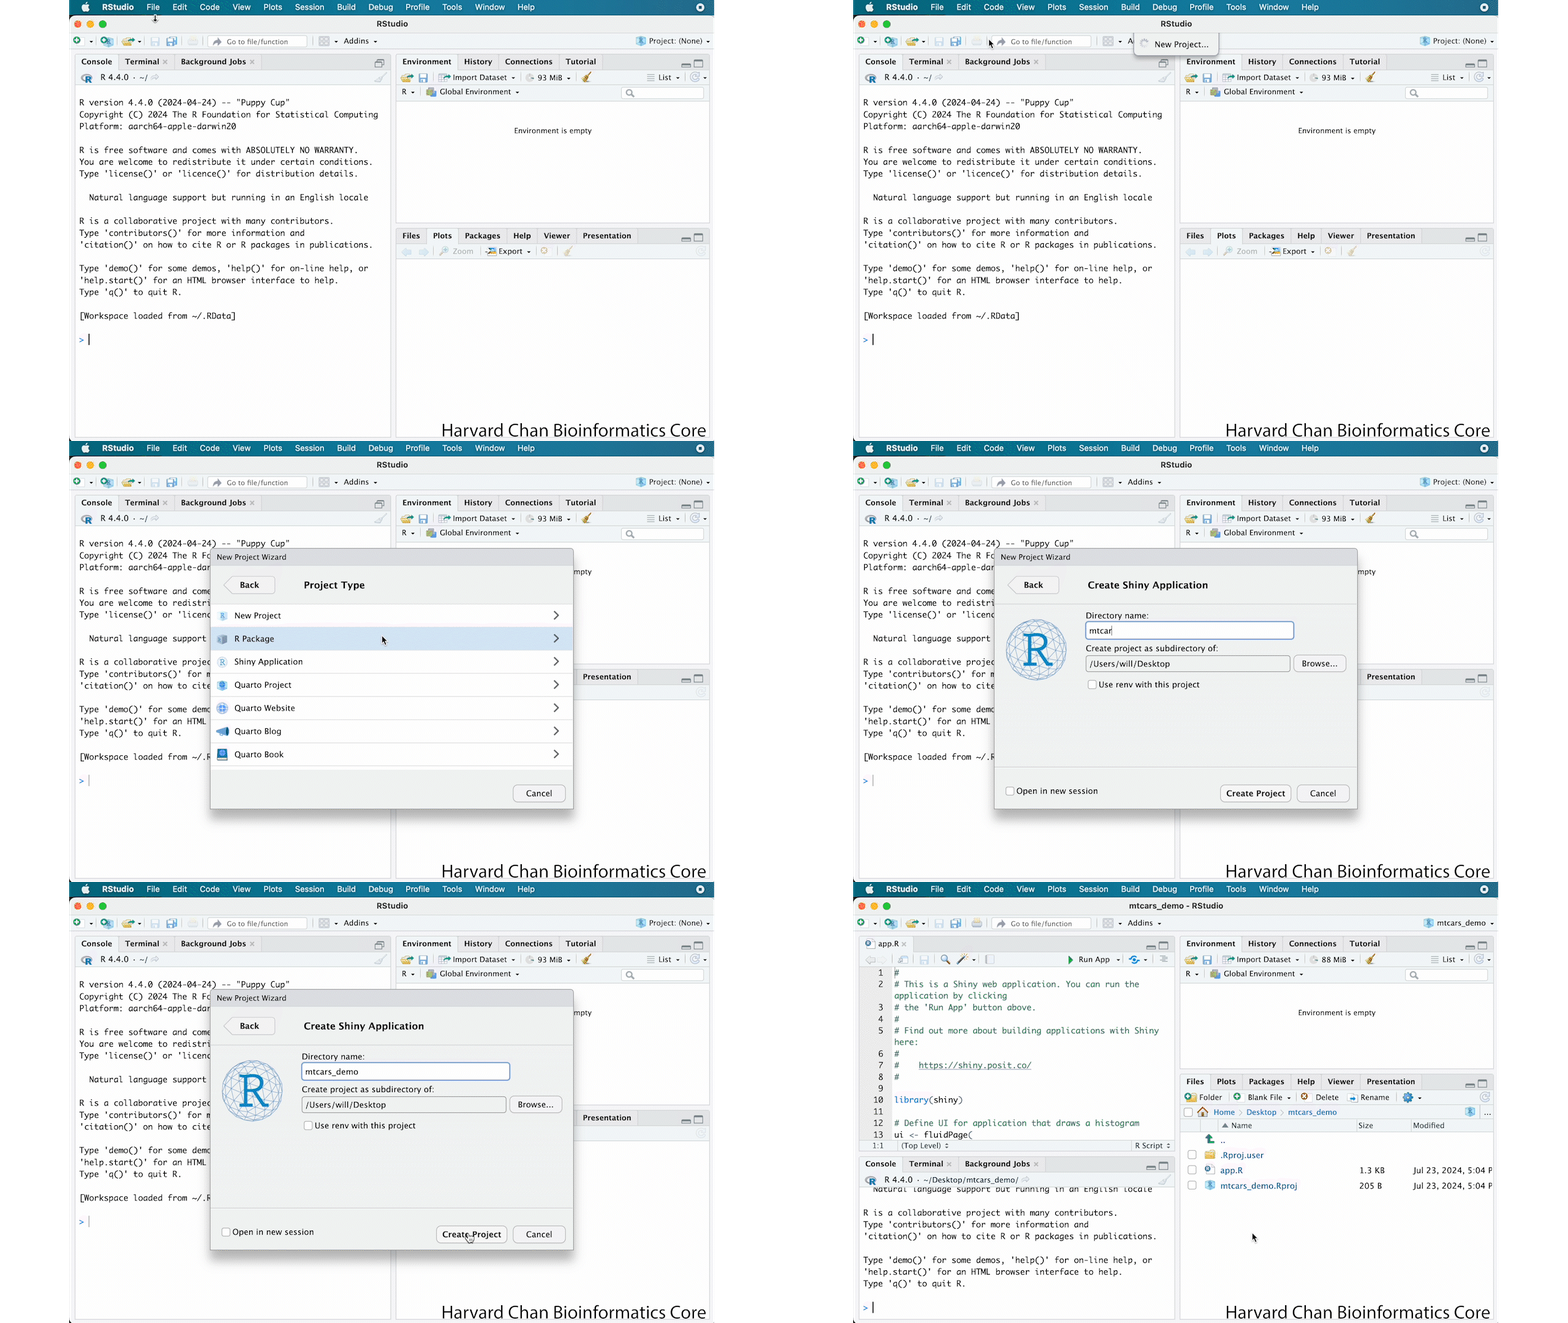
The first step in the process is to create an RStudio project. In order to do this:
- Go to your RStudio toolbar and select “File” and then select “New Project”
- A pop-up window should appear where you can select “New Directory” and the window should progress to a allow you to choose “Shiny Application”. One benefit of selecting Shiny Application here is that it will automatically create an R script called “app.R”.
- Enter the name of your RStudio project, in this case we are going to call ours “mtcars_demo”
- (Optional) You can select where you would like this project to be saved to by clicking the “Browse…”. However, we are happy saving it to our Desktop.
- Click “Create Project”
These steps are shown in the GIF below:
Make the app
The next step in this process is likely the longest step because you now need to make your app! However, we are going to take a shortcut here and use an app that we have already created for this demonstration.
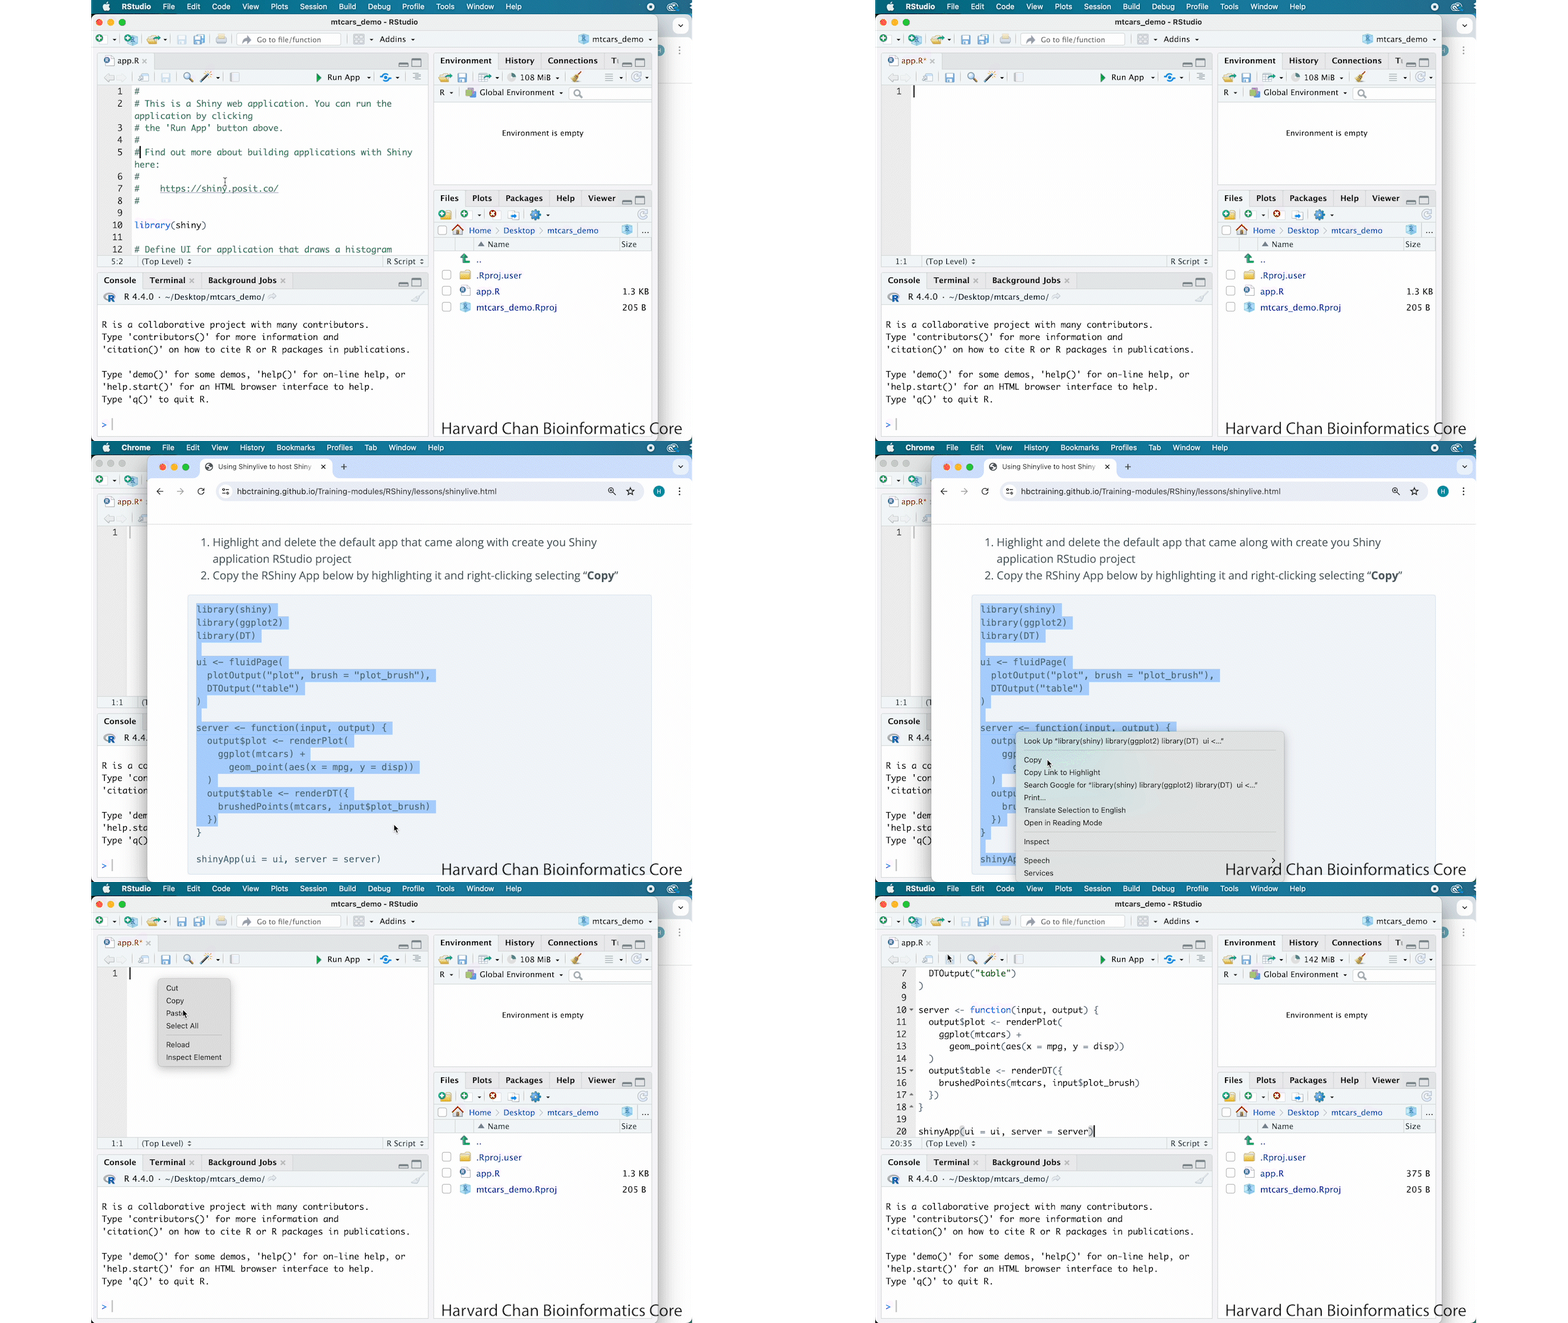
- Highlight and delete the default app that came along with create your Shiny application RStudio project
- Copy the RShiny App below by highlighting it and right-clicking the highliughted text and selecting “Copy”
library(shiny)
library(ggplot2)
library(DT)

ui <- fluidPage(
  plotOutput("plot", brush = "plot_brush"),
  DTOutput("table")
)

server <- function(input, output) {
  output$plot <- renderPlot(
    ggplot(mtcars) +
      geom_point(aes(x = mpg, y = disp))
  )
  output$table <- renderDT({
    brushedPoints(mtcars, input$plot_brush)
  })
}

shinyApp(ui = ui, server = server)
- Right-click the script editor panel in your RStudio project and select “Paste”
- Save your app by left-clicking on the “Save” icon in RStudio
These steps are shown in the GIF below:
Create docs and export
In order for GitHub Pages to be able to render your Shiny app, you will need to have a specifically named directory called “docs”, which will hold the files output from Shinylive.
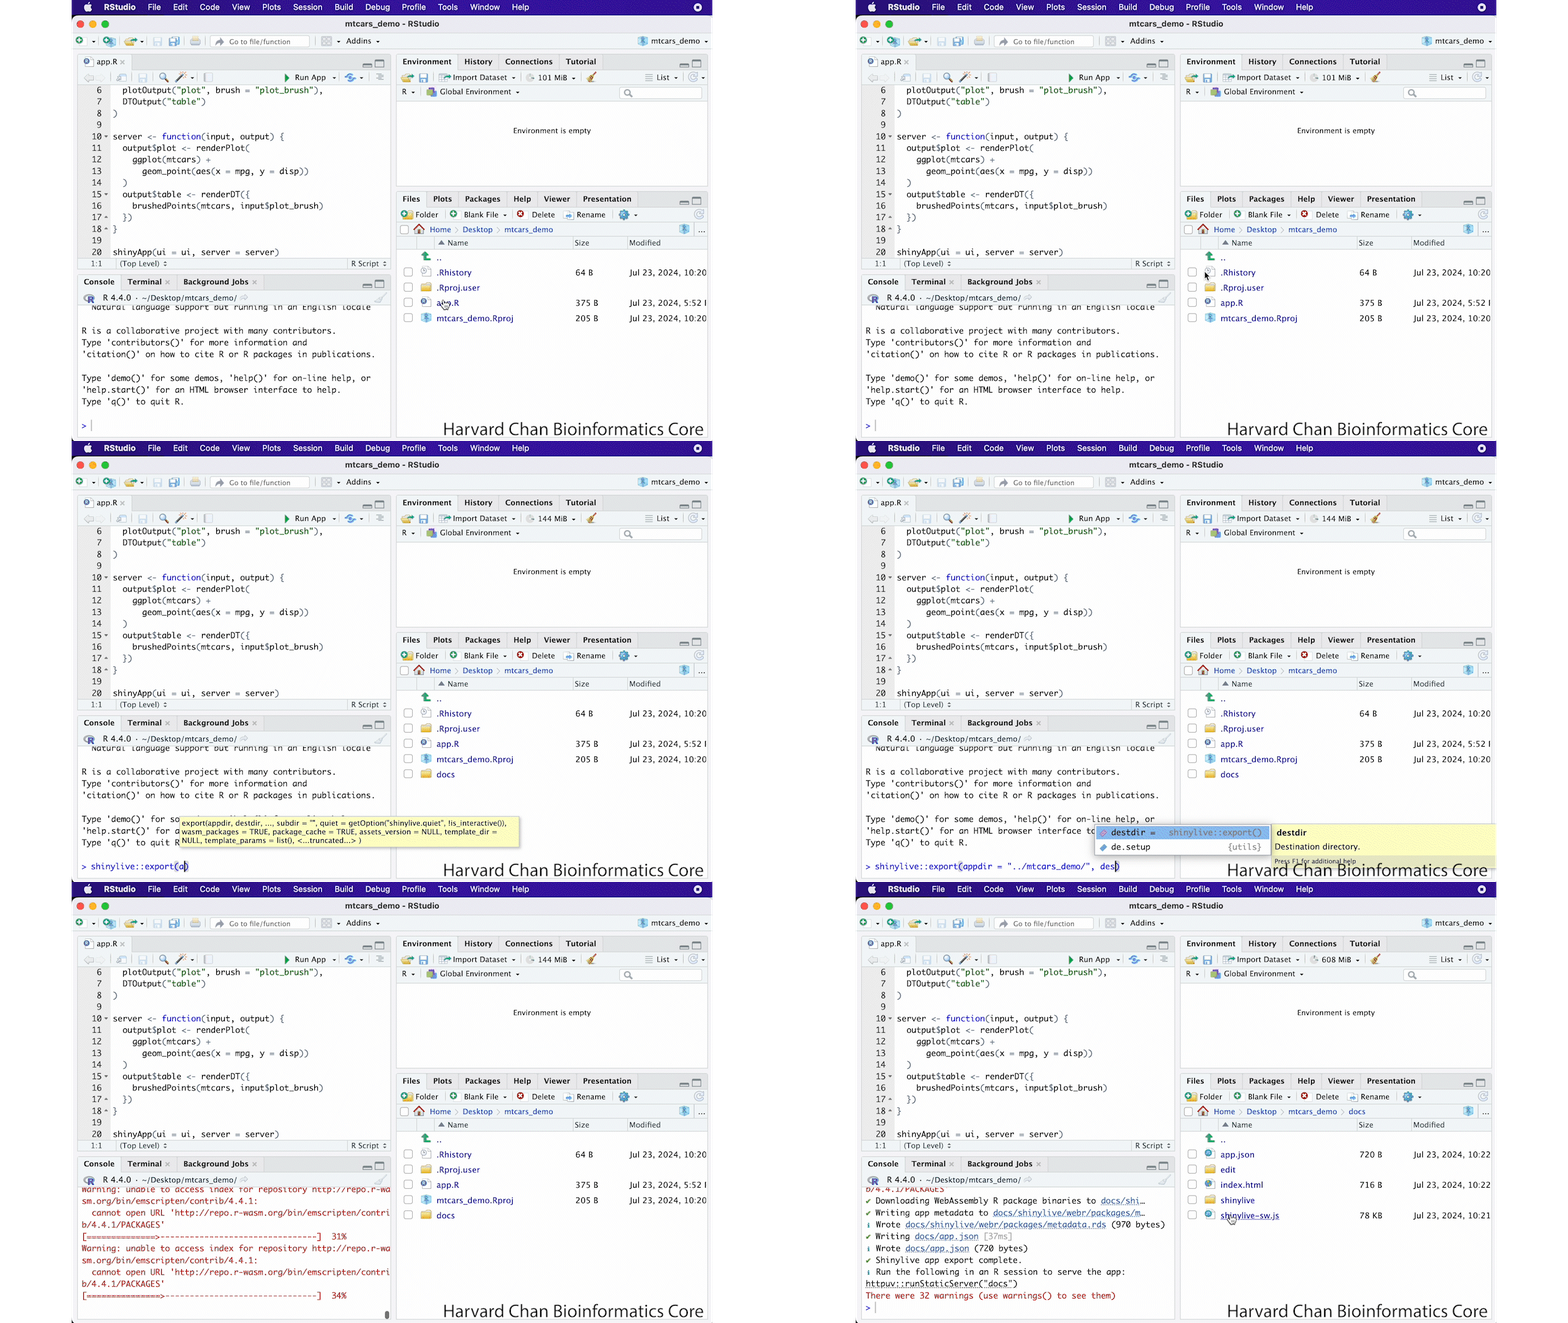
- Click the “Create a new folder” icon in RStudio
- Named the new directory “docs”
- Within the console type the following command:
shinylive::export(appdir = "../mtcars_demo/", destdir = "docs")
This command uses shinylive to export your app found in the app directory (appdir in the command) and direct the output (destdir) into our newly created docs directory.
These steps are shown in the GIF below:
Note: The following command will also work:
shinylive::export(appdir = ".", destdir = "docs")However, we opted not to use this command in this demo so it would be a bit more clear what the
appdirargument was taking in. As a result, we used a relative path to go up a directory then come back down into our current directory. However, for your own work you may opt for this alternative method of directly calling the current directory.
View with httpuv (Optional; but strongly encouraged)
Once you have created your app with shinylive you will likely want to inspect your app locally to be sure that it is how you want it. This is an optional step, but we recommend visualizing your app at this point as a check to make sure the app was rendered correctly. However, one issue with visualizing your app at this point is that it can’t be visualized through tradional methods of looking at your app. You will instead need to emulate the static webpage and visualize it in there. The httpuv package allows you to visualize static webpages in R.
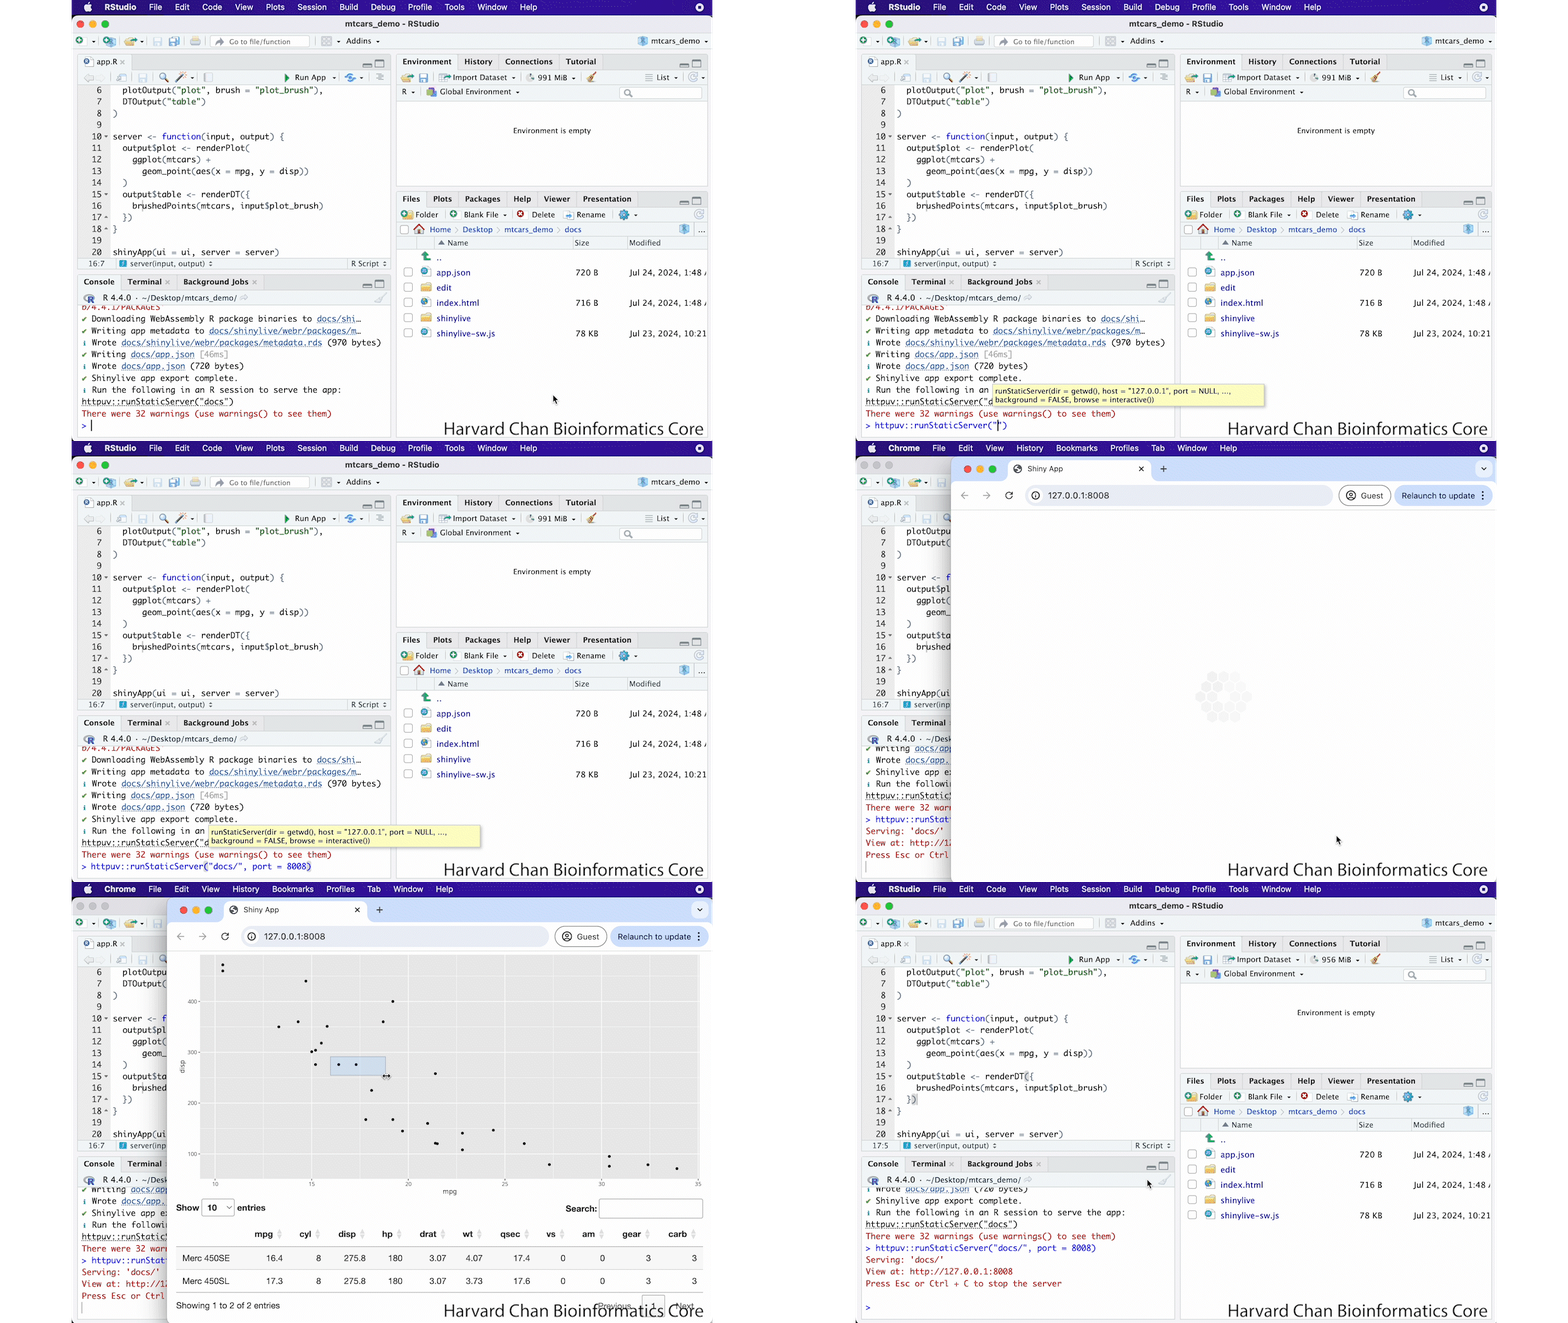
- In the console enter:
httpuv::runStaticServer("docs/", port = 8008) - Inspect your app within your browser to make sure that it is working correctly
- Left-click on the stop sign above your R console to stop the app
These steps are shown in the GIF below:
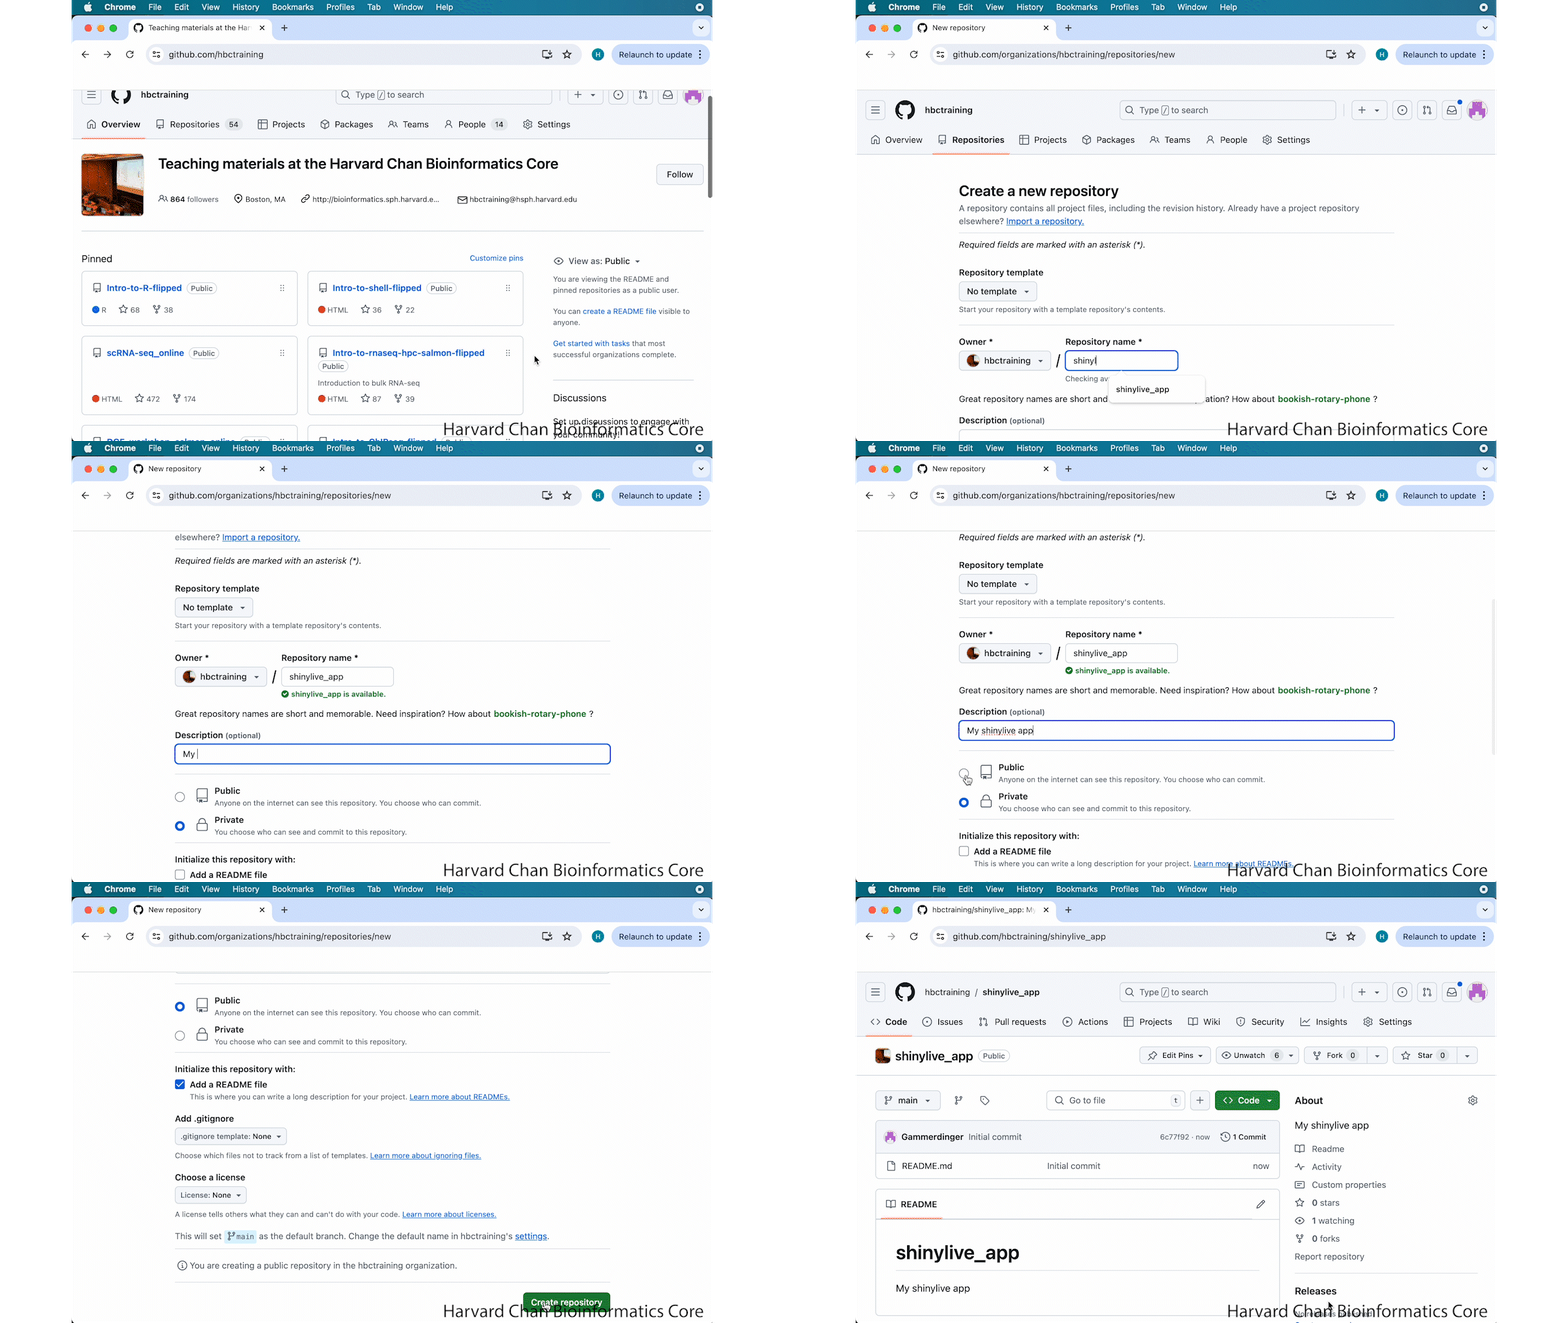
Make GitHub Repository
Now that we have made the app and prepped it for being on GitHub, we now need to create a GitHub repository ready to hold our app.
- Navigate to your GitHub page
- Scroll down to the green “New” button to create a new repository on GitHub
- Name your repository in the box underneath “Repsitory name”. We named our app
shinylive_appand this will be used in the app URL when we are finished - (Optional) Include a description of your app
- Select that you would like this repository to be a “Public” repository rather than a “Private” repository
- (Optional) You can check the text box next to “Add a README file” if you would like to have a README file automaically created with your repository
- Left-click “Create Repository” at the bottom of the webpage
These steps are shown in the GIF below:
Manage GitHub Pages Settings
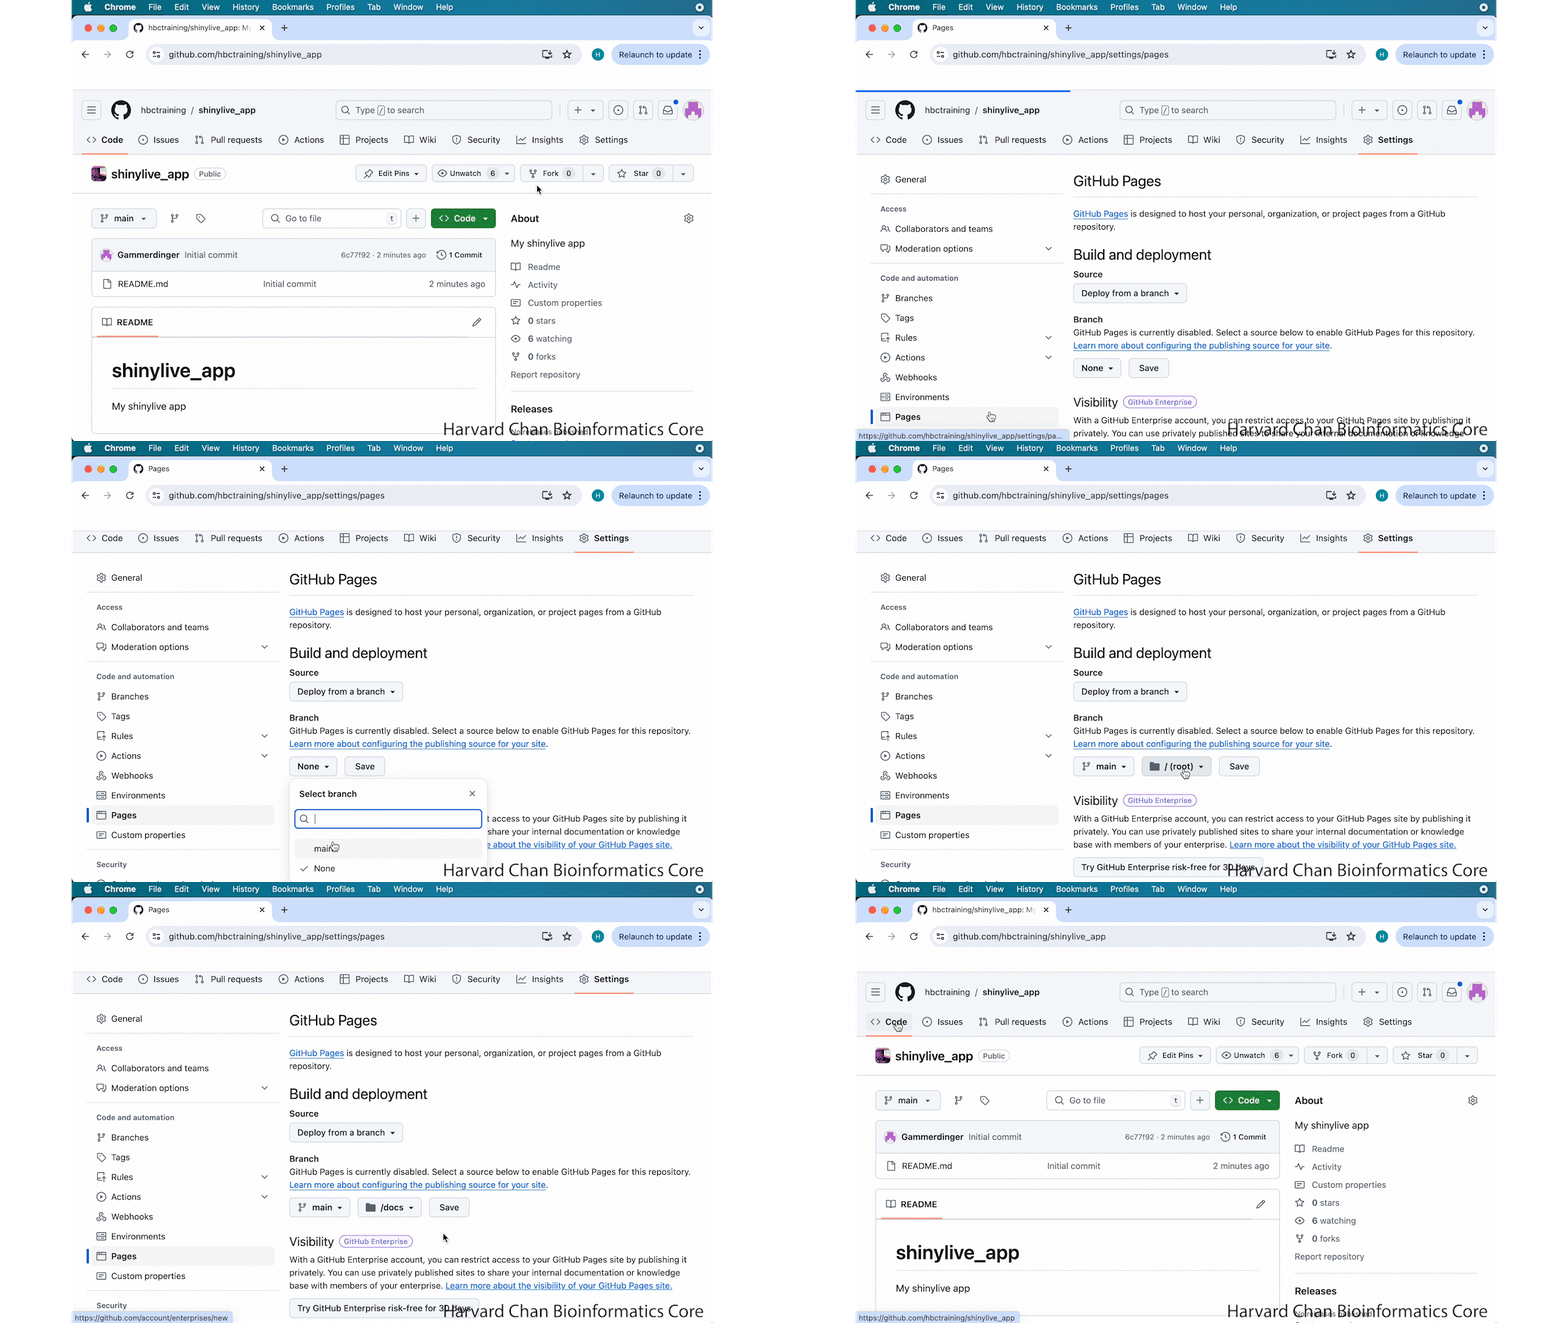
Now that we have created our GitHub repository, we will need to edit a few of the settings to allow us to have the Shiny app visualized directory.
- In your repository, left-click on the “Settings” tab
- On the left-hand side of the webpage, you should now be able to select “Pages” from a menu bar
- Left-click on the “Branch” dropdown menu and select “
main” - Left-click on the “Folder” dropdown menu that has just appeared next to the “Branch” dropdown menu and select “
/docs”. This is why we had to name our destination directorydocswhen creating it usingshinylive - Left-click the “Save” button
- (Optional) You can return back to your code tab on GitHub if you wish, we will not need to adjust any further settings
These steps are shown in the GIF below:
Clone your GitHub Repository
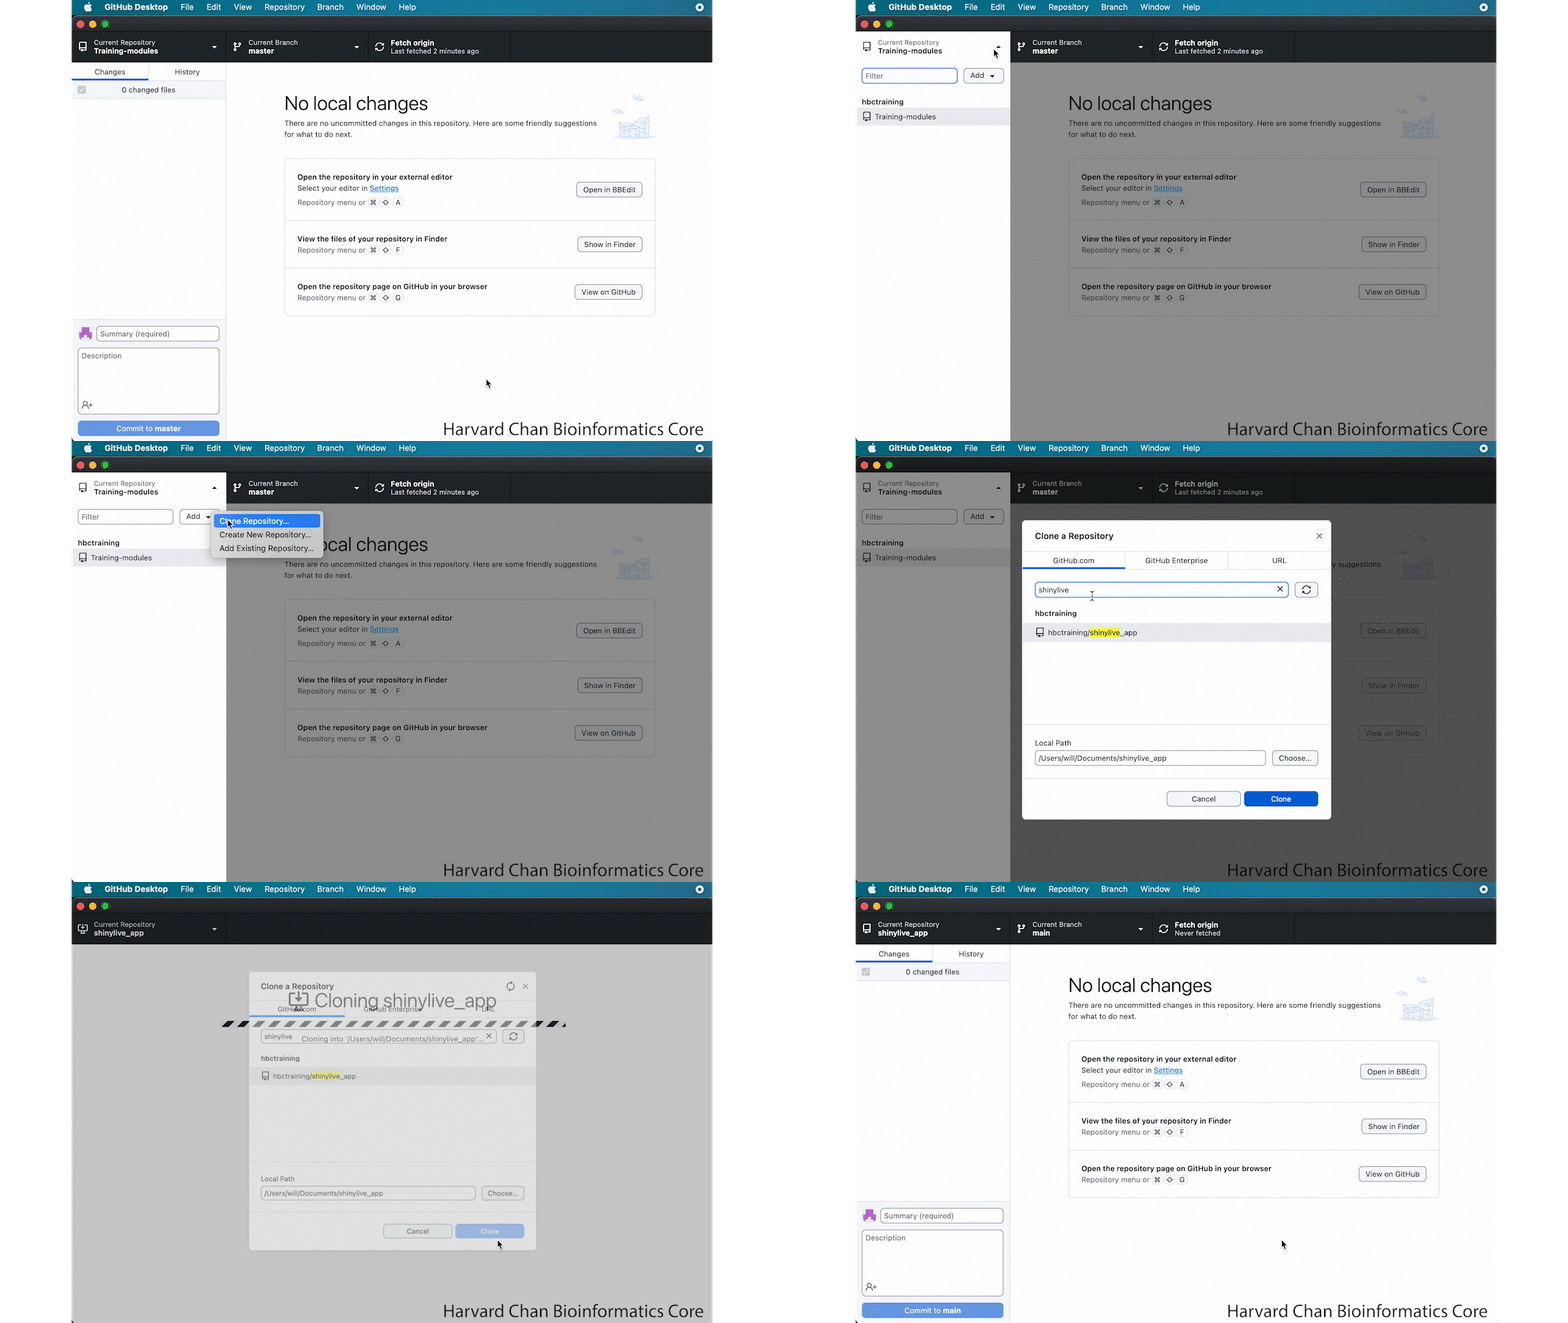
Now that we add created our GitHub repository and gotten the settings right, we now will need to clone (or copy) our repository to our local computers.
- Open GitHub Desktop
- Left-click on the “Current Repository” tab on the top left corner of GitHub Desktop
- Left-click on the dropdown menu currently displaying “Add”
- Select “Clone Repository…”
- Type the repository name that you used when creating your repository into the “Filter your repositories” text box. In our case, we type are typing in “shinylive_app”, but by the time we have typed in “shinylive” there is only one option left.
- Make sure the GitHub repository that you want to clone is highlighted
- Left-click the blue “Clone” button
These steps are shown in the GIF below:
Copy app to your cloned GitHub Repository and push to the origin
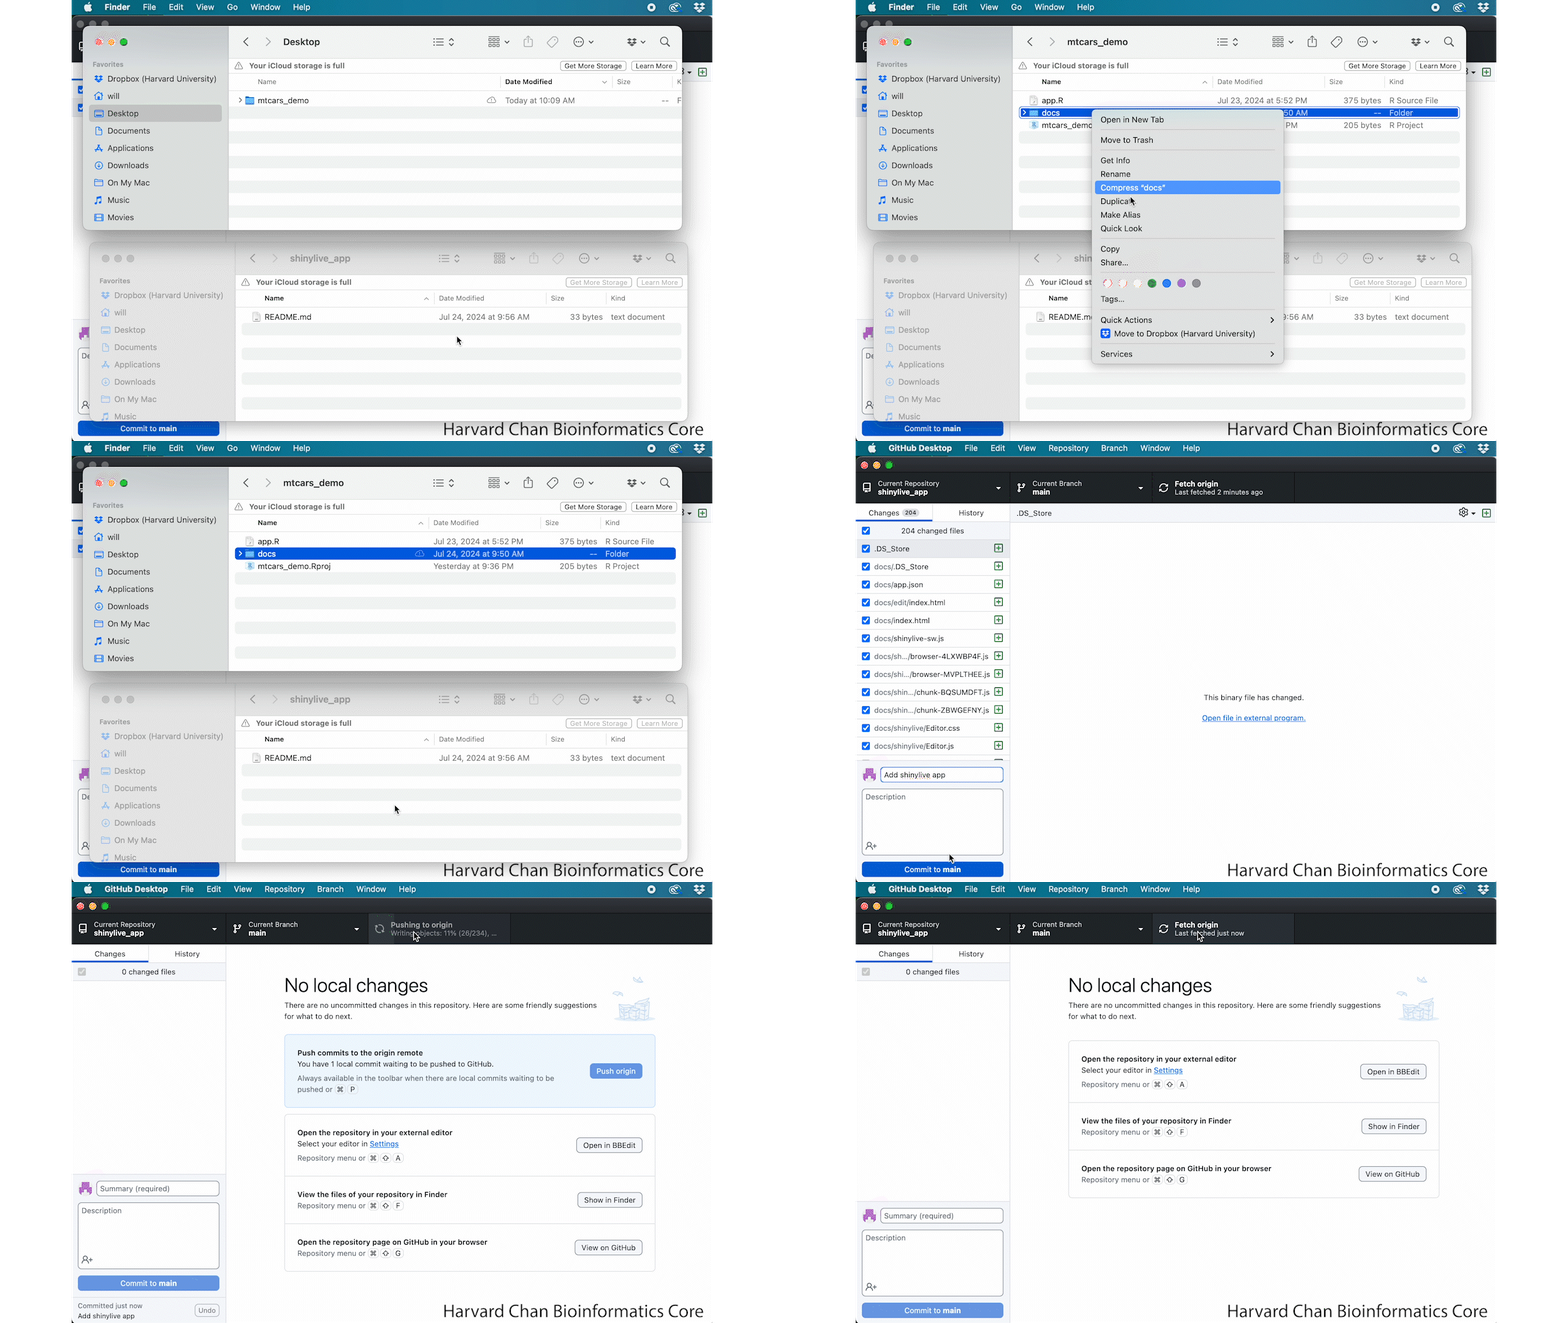
Now that we’ve cloned our GitHub repository locally, we will need to add the “docs” directory from our app’s directory to our cloned GitHub directory.
- In a file browser, right-click on “
docs” directory within your app’s directory and select “Copy” - In a second file browser open your cloned GitHub repository or by navigating to your cloned GitHub repository in your same file browser, right-click and select “Paste” or “Paste Item”
- In GitHub Desktop, add a summary for this commit in the “Summary (required)” text box
- (Optional) You can add an optional description for this commit
- Left-click the blue “Commit to main” button
- At the top of your GitHub Desktop, left-click the “Push origin” button
These steps are shown in the GIF below:
View your app on GitHub Pages
You have now uploaded your app to GitHub, so we can look at what it
- In your web browser’s URL enter:
https://<github_username>.github.io/<app_name>/
Replace <github_username> with your GitHub username and <app_name> with your app’s name. Your app should appear after taking a moment to load!
These steps are shown in the GIF below:
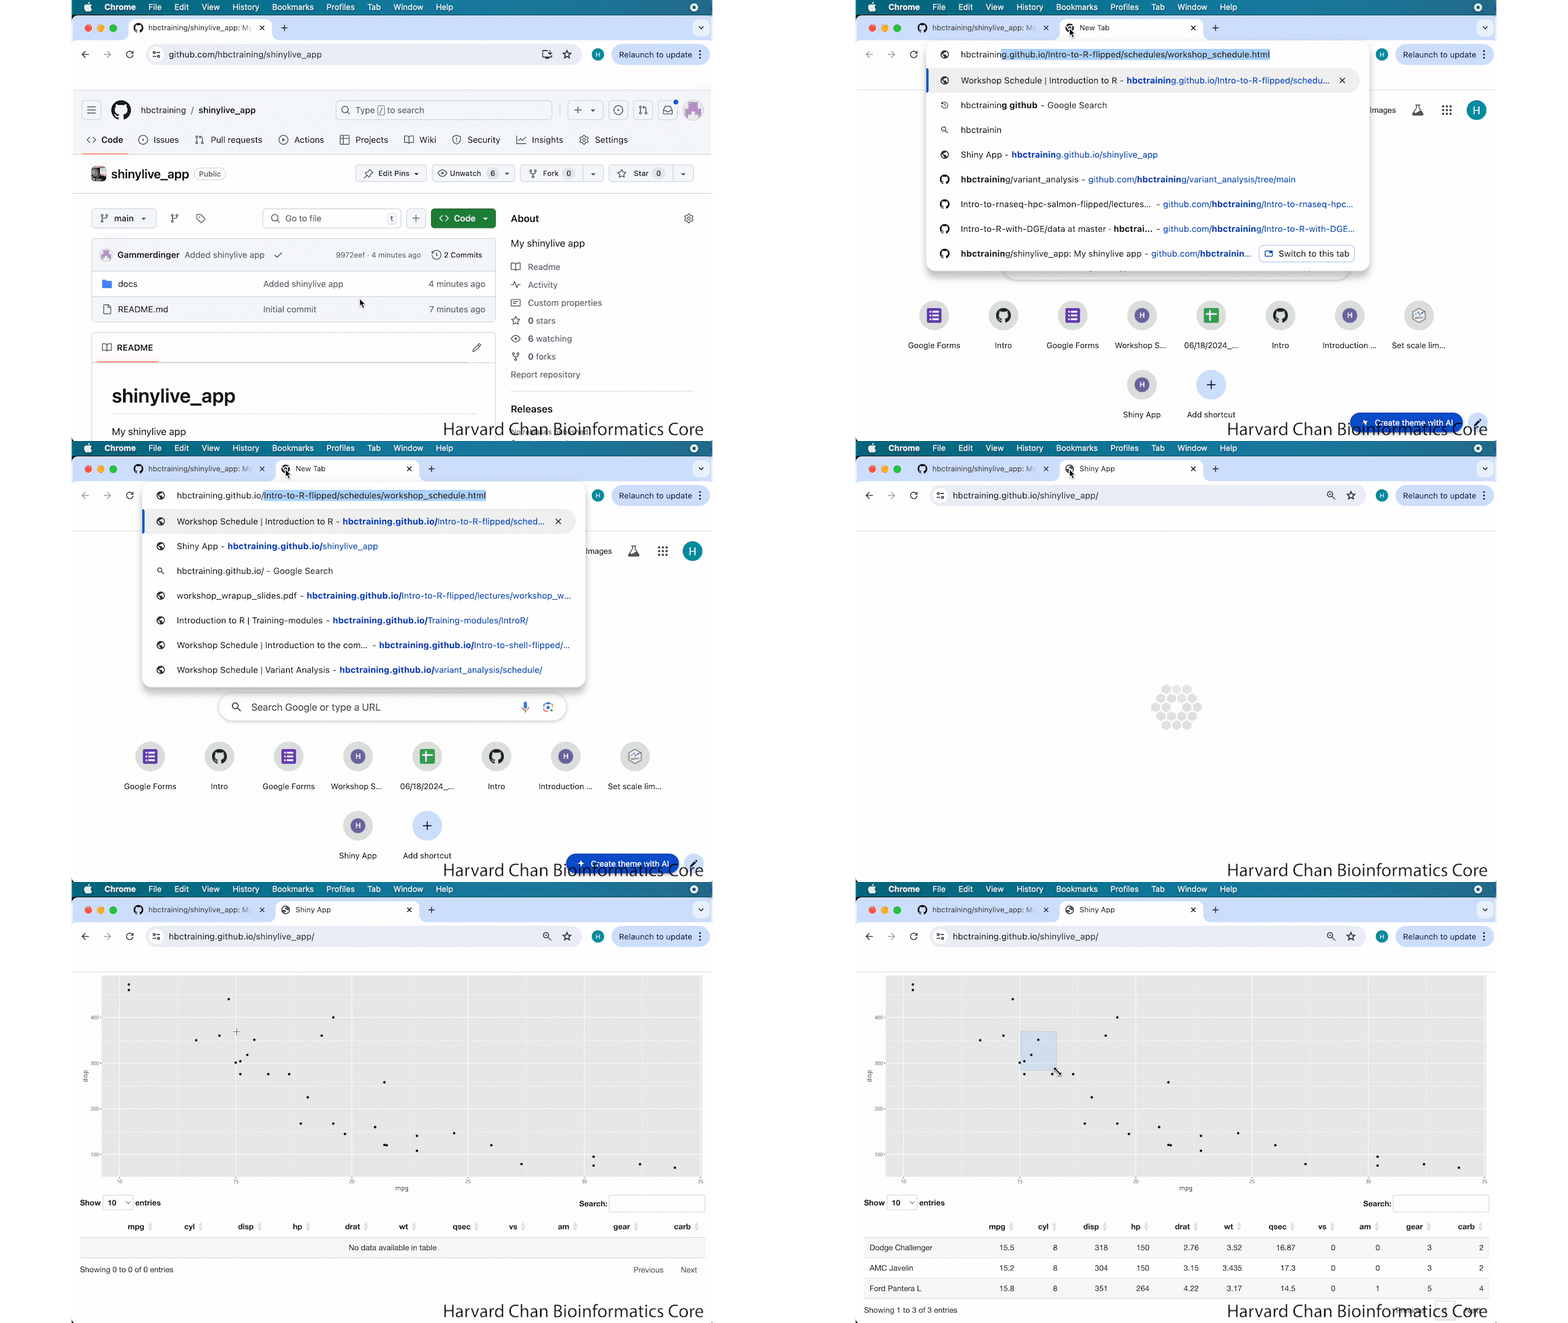
Congratulations! You have successfully added your app to a GitHub Pages using shinylive! Now you can share your app with your colleagues without the need of having a server to host your app!
You can see the app that we created here.