Approximate time: 45 minutes
Learning Objectives:
- Opening RStudio environment on O2
- Running an R Script on the O2 cluster on the command-line
RStudio and RStudio on the O2 Portal
RStudio is freely available open-source Integrated Development Environment (IDE). RStudio provides an environment with many features to make using R easier and is a great alternative to working on R in the terminal.
- Graphical user interface, not just a command prompt
- Great learning tool
- Free for academic use
- Platform agnostic
- Open source
The O2 Portal provides an opportunity for researchers to leverage the resources of a computing cluster while maintain the interactive nature of an RStudio environment.
View our current jobs
Before we get started with creating an RStudio session on O2, let’s first look at the jobs we have running on O2 using the squeue command. This will show our currently running jobs:
squeue -u $USER

NOTE: The
-uoption allows the use to specify the user to return from thesqueuecommand and $USER is a special variable with your username.
We can see that we currently have 1 interactive job currently running. We will continue to monitor our jobs using the watch function. The watch command will re-run the command that follows periodically so that we can “watch” the progress of the command and it will feel like it will be updating in real-time. The default is for it to update every two seconds.
watch squeue -u $USER
Selecting the Resources for RStudio
Now we can request the resources that we need for RStudio. In order to do this, we will need to open up our web browser and go to:
https://o2portal.rc.hms.harvard.edu
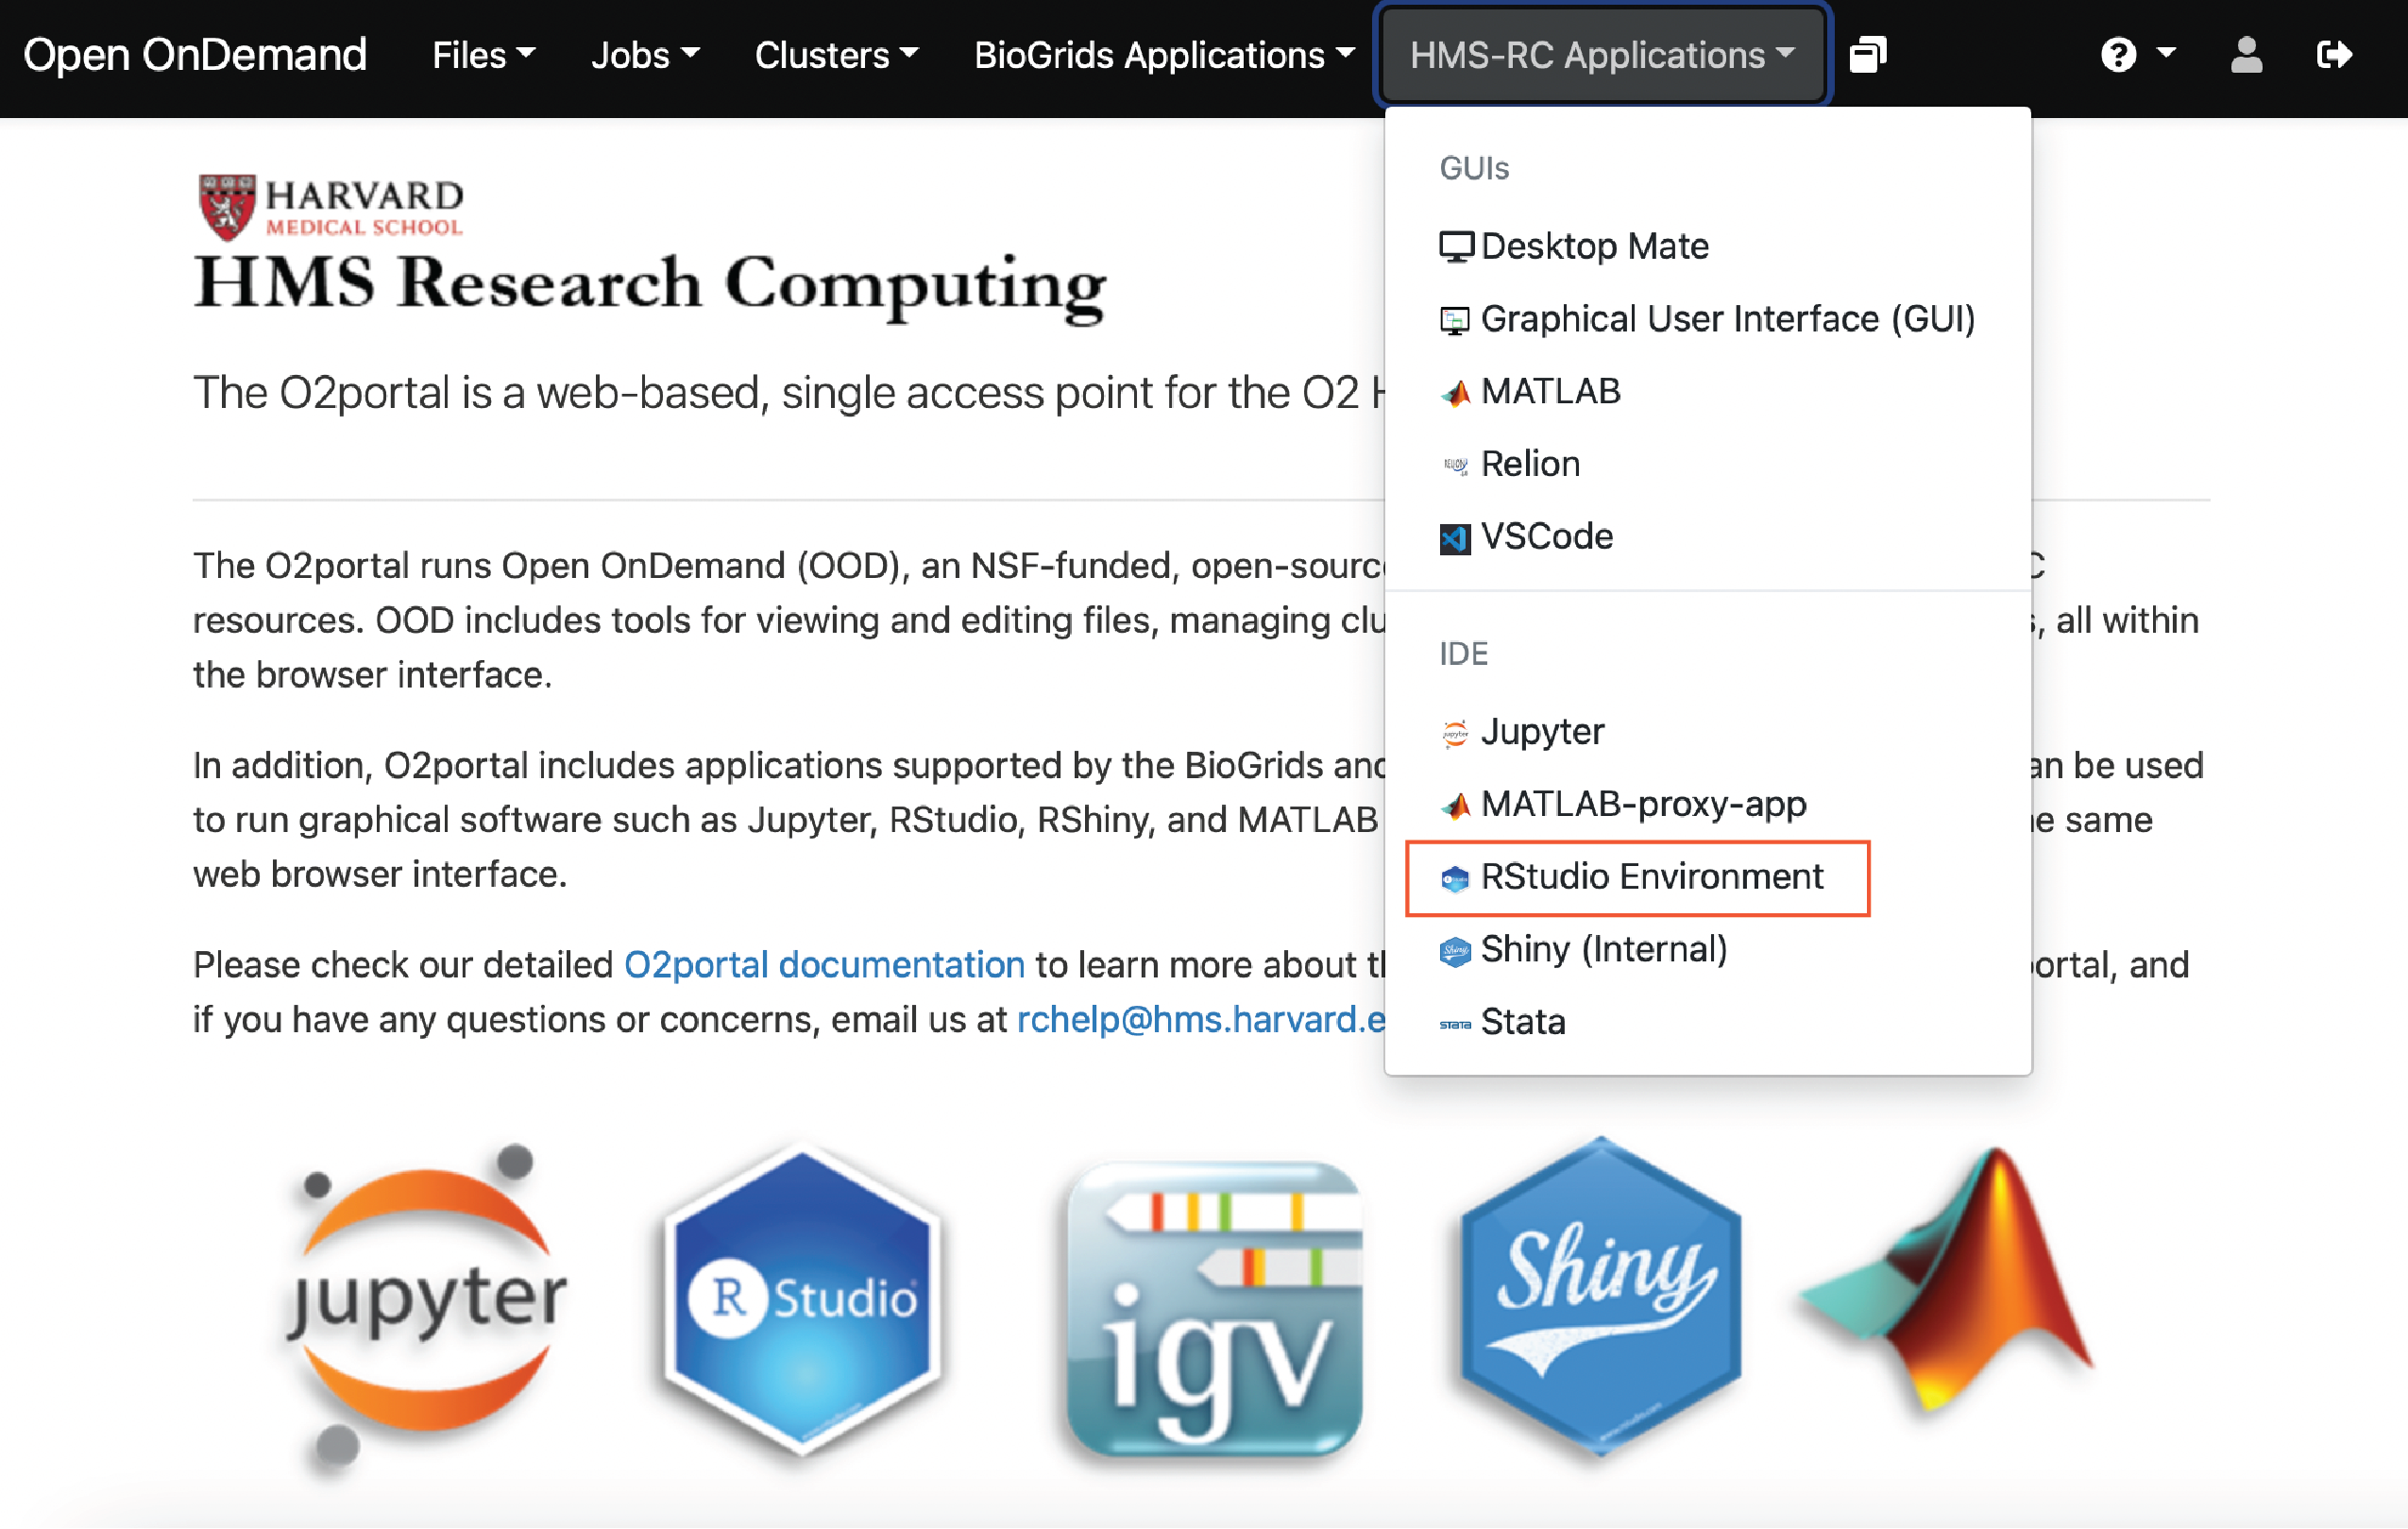
At the top ribbon of the webpage we can select the HMS-RC Applications tab and a dropdown menu will appear. From this dropdown menu, select RStudio Environment.
At this point, you may be asked to provide you Harvard Key credentials and carry out Duo two-factor authentication. Now we are on a page where we can request resources for our RStudio environment. We need to request the partition, number of cores, wall time and memory. Because this is just an example, we are just going to use the short partition, a single core, an hour of wall time and 1 GB of memory.
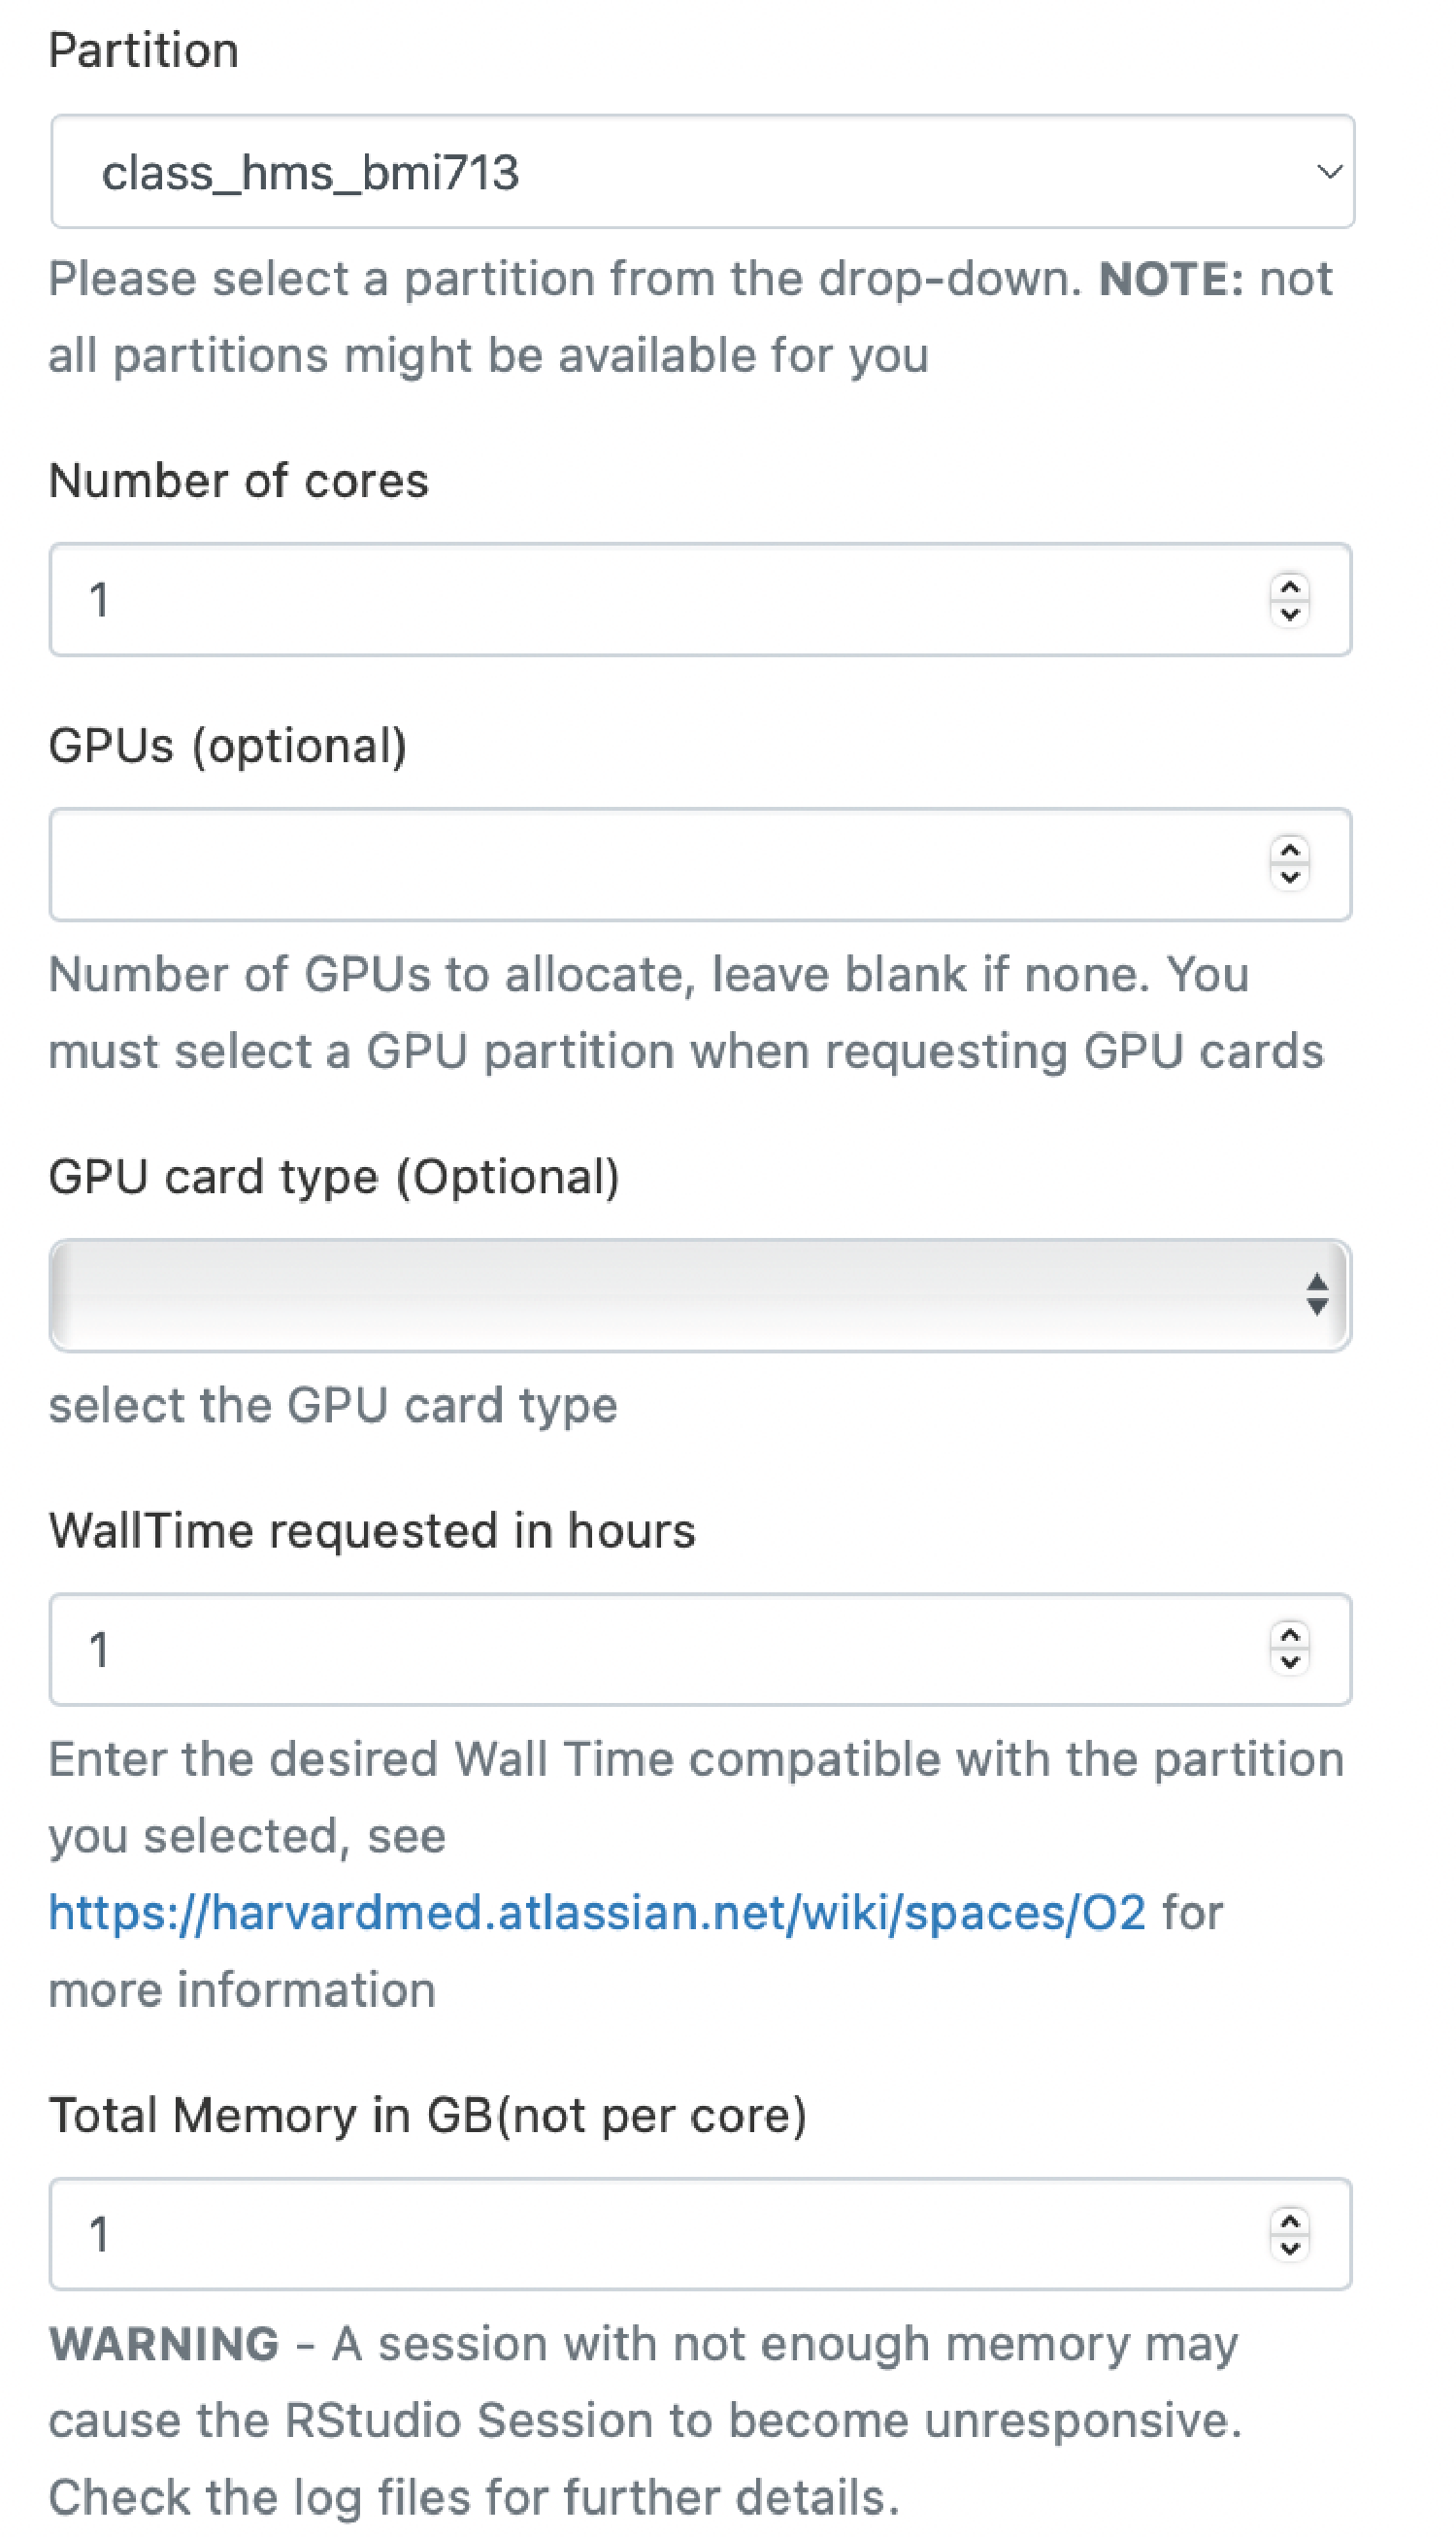
Note: If you have more than one possible account to charge, you will need to use the dropdown menu to select the account to charge. In this case, we need to select
class_hms_bmi713as our account.
Once we have requested those resources, we can also click checkboxes to make certain data storage are availible to us. Once we have selected any additional data storage we want access to, we can click “Launch” at the bottom.
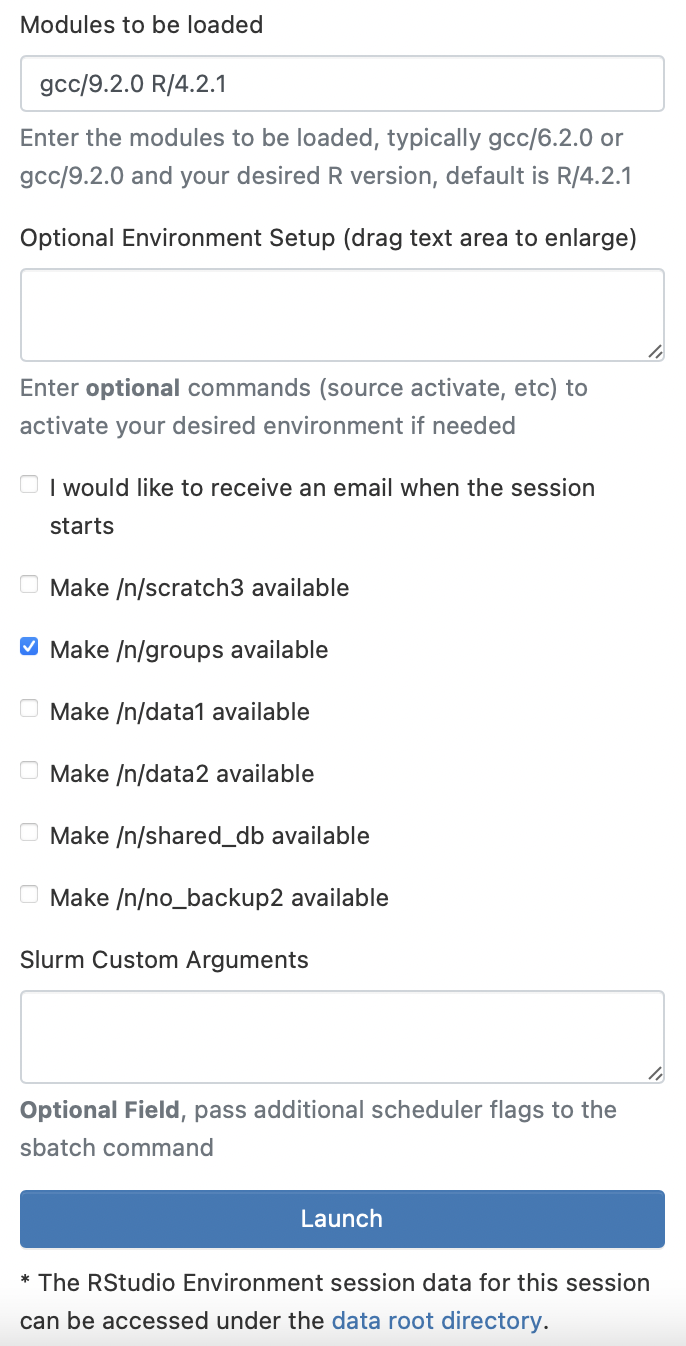
Note: If we had not previously exported our libraries, then you can also embed the command we previously added to our
~/.Renvironfile into the “Optional Environment Setup” box:export R_LIBS_USER="~/R/4.2.1/library"
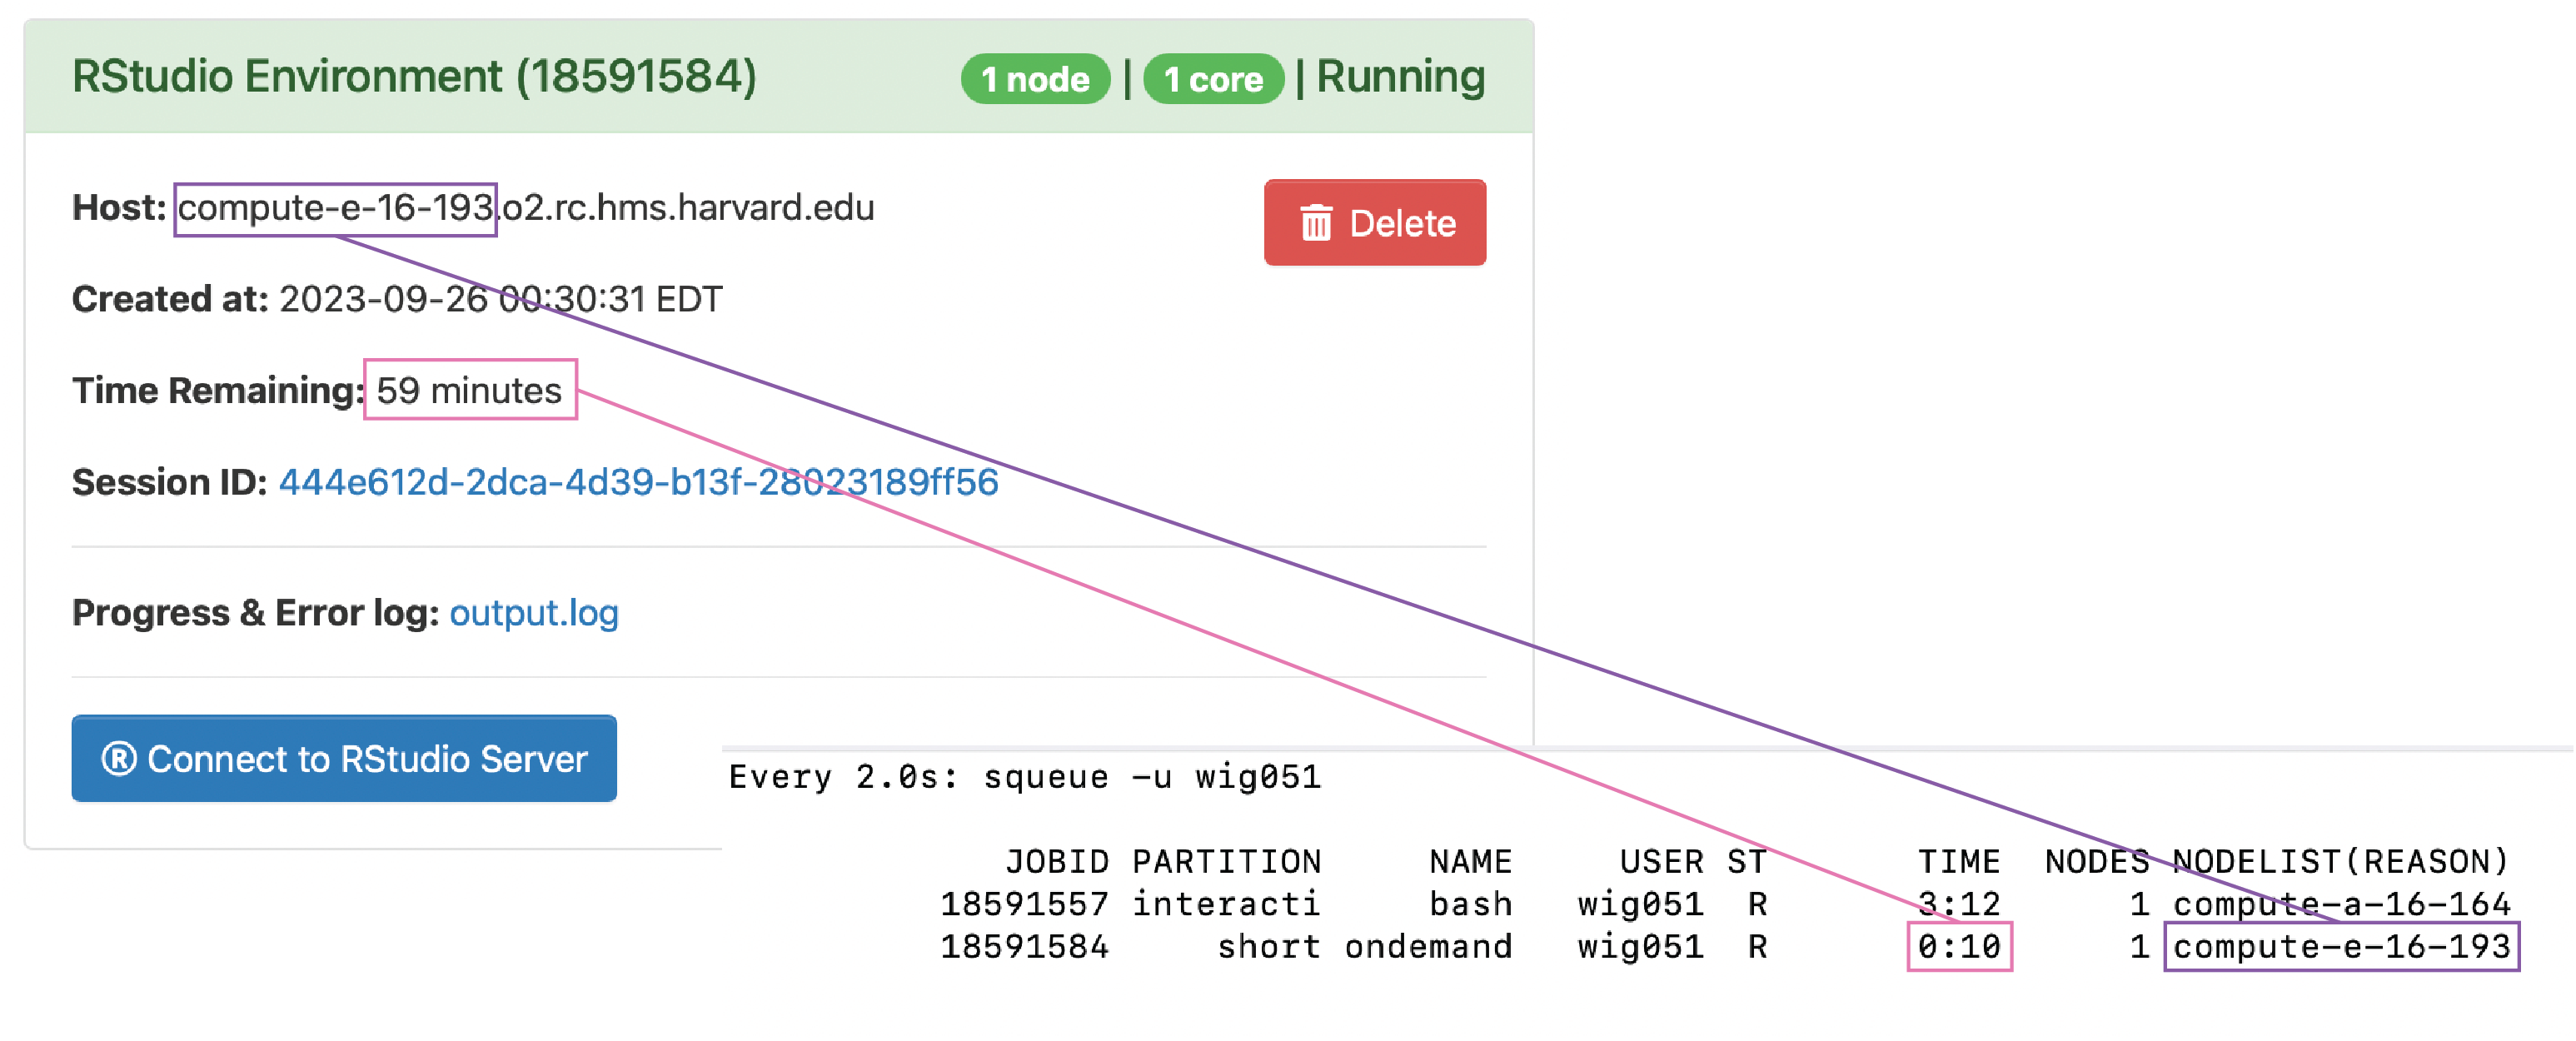
We can now see that our job is queued in our sbatch command on the terminal and the Job ID matches the number in the parantheses in our browser (in red below). Initially, our job will be slated as “Queued”, which is also shown in the browser window and in the terminal (in orange below).
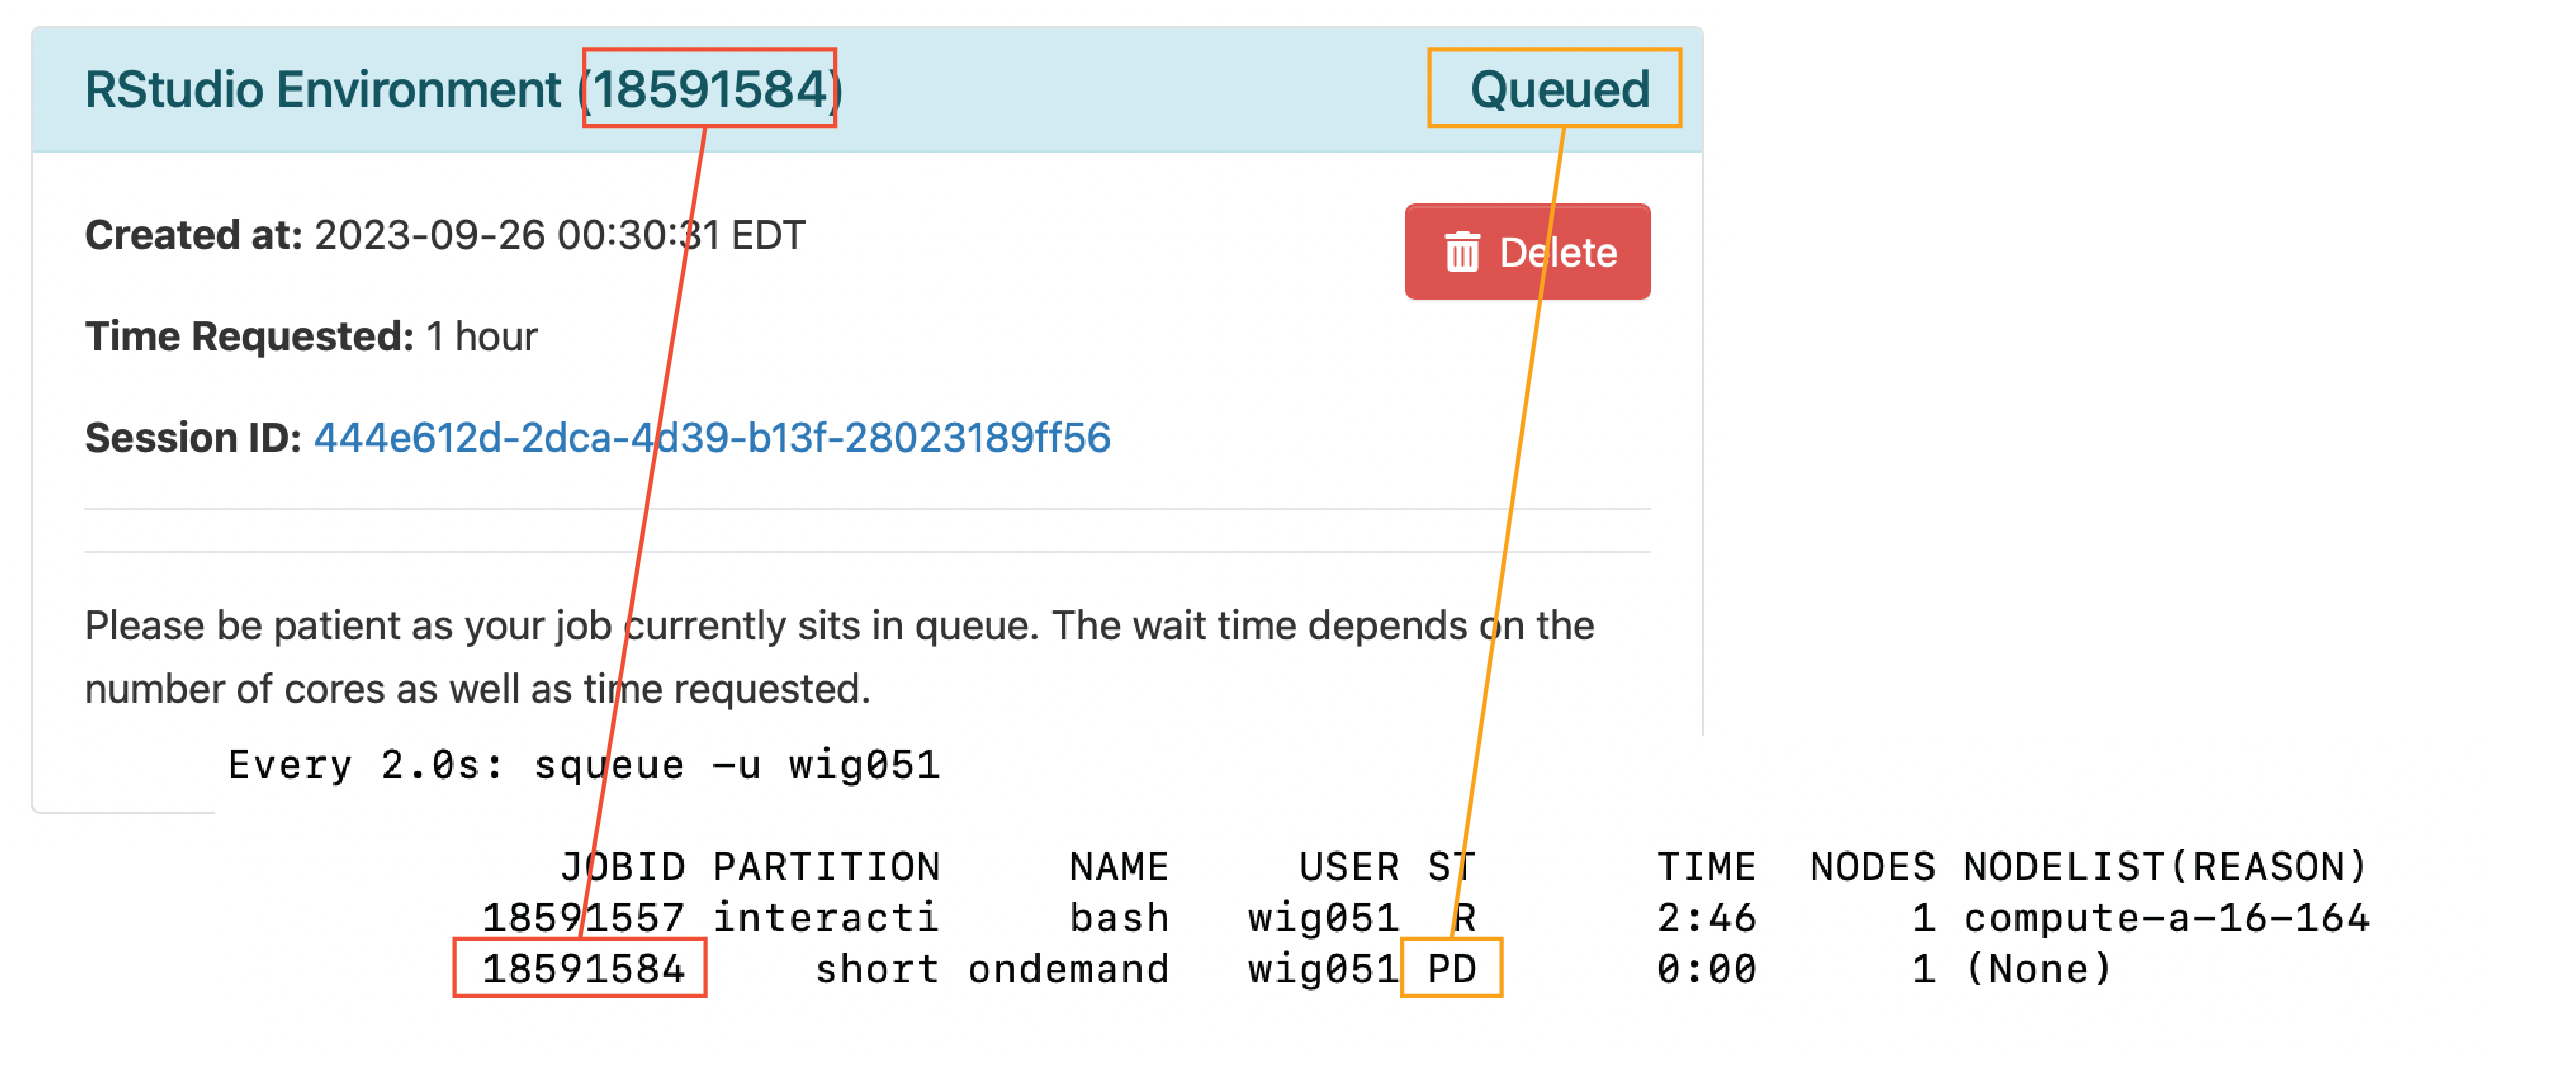
Once the resources for our job have been allocated, the job will have started, regardless of whether we have clicked “Connect to RStudio Server” to open up RStudio in our browser. Once again, you can see the correspondence between the browser and terminal for Job ID, status, compute node (in purple below) and wall time (in pink).
We can start our RStudio environment by clicking on the “Connect to RStudio Server” button. An RStudio window should now open up in your browser and you can use it is just like RStudio on your laptop, except now you have access to the resources of an HPC.
Open up the script in RStudio
Let’s make some edits to our R script, sqrt_input.R, in the browser. Let’s change:
round(sqrt(num), digit=2)
Now let’s add two to the output of the rounded square root:
round(sqrt(num), digit=2) + 2
We can save these changes and look at our Rscript in the terminal:
less sqrt_input.R
Now we can see that our edits are reflected in the R Script.
Closing a Tab with RStudio
Perhaps you need to close your computer or your browser window, what will happen to your job and the data currently in your R environment? No worries, it will all still be there as long as the RStudio job is still running on the cluster. Importantly, when you close the tab that that is holding the RStudio IDE, then this does not end the session or end the job. The variables in your environment are still being held on the cluster. This can be really nice when working on long computations. Let’s go ahead and close a tab in our web browser containing our RStudio IDE.
We can log back into the O2 Portal page and click on the “Connect to RStudio Server” and it will bring back the session you were working on as long as your job is still running.
Saving RStudio Environments
However, you might want to save everything you are working on because your job allocation is coming to an end or you have finished your analyses. In order to demonstrate what to do in this scenario, let’s first assign a few variables:
x <- 2
y <- 3
z <- x + y
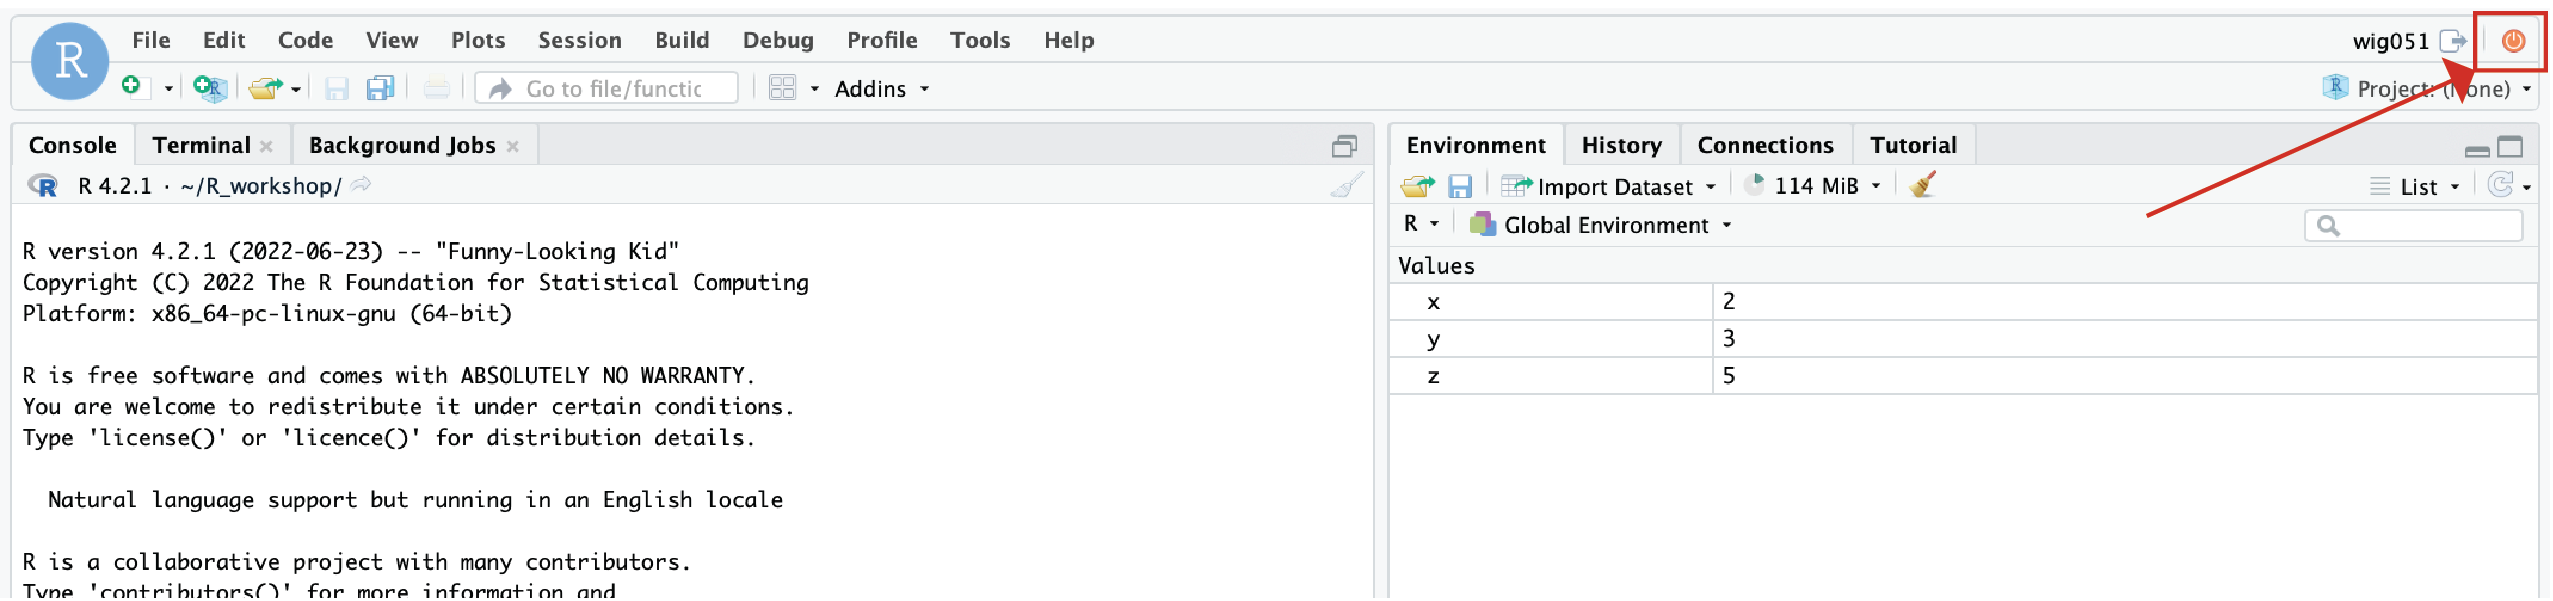
Now, let’s go ahead and close our RStudio session by clicking the red button in the upper right of the session.
Note: Impartantly, this is closing the RStudio session. When we closed the tab holding the RStudio earlier, it actually didn’t close the RStudio session. This is an important distinction which we will soon see.
Once we have closed the RStudio session, we will have an option to reopen it. When we reopen it, you will notice that it is the environment has been wiped clean. That is because the environment is not saved when closing an RStudio session. In order to save the environment, you will need to use the save.image() function in R. Let’s once again, assign a few variables:
x <- 2
y <- 3
z <- x + y
But this time, before you close our RStudio session, let’s go ahead and save the environment using the save.image() function:
save.image()
Now, our environment is saved by default to a hidden file .RData in our Home directory. However, we can save it to a specific directory, such as our R_workshop directory by providing the path to this directory. Let’s make our environment a bit different so that we can differentiate the two .RData environments.
a <- 1
Now let’s save this .RData object to out R_workshop directory:
save.image("~/R_workshop/.RData")
Now let’s close our RStudio session and re-open it. We will notice that by default RStudio is reading the .RData image from our Home directory, because the a variable is not in the environment. However, if you want to load the .RData image from our R_workshop directory, then we can use the following command:
load("~/R_workshop/.RData")
Now we can see that our a variable is present.
This lesson has been developed by members of the teaching team at the Harvard Chan Bioinformatics Core (HBC). These are open access materials distributed under the terms of the Creative Commons Attribution license (CC BY 4.0), which permits unrestricted use, distribution, and reproduction in any medium, provided the original author and source are credited.